

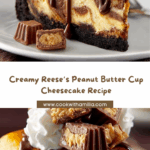
If you adore the heavenly combination of creamy cheesecake and rich, nutty peanut butter, then this Reese’s Peanut Butter Cup Cheesecake will soon become your absolute favorite dessert. Imagine a silky smooth filling loaded with luscious peanut butter and studded with chunks of Reese’s peanut butter cups, all resting on a crunchy Oreo crust, then topped with a glossy chocolate ganache and more peanut buttery sweetness. It’s a dessert that perfectly balances indulgence and comfort, making every bite a celebration of flavors and textures you’ll want to share with friends or sneak away for yourself!

Ingredients You’ll Need
Whipping up this Reese’s Peanut Butter Cup Cheesecake is easier than you think because every ingredient plays a vital role in crafting its irresistible taste and texture. From the crunchy Oreo base to the creamy peanut butter filling and luscious chocolate topping, each part works together to create pure magic.
- 24 Oreo cookies (crushed into fine crumbs): Provides a rich, chocolatey, and crunchy crust foundation that holds everything together perfectly.
- ¼ cup (60 g) melted butter: Binds the Oreo crumbs for a solid yet tender crust with delightful buttery notes.
- 3 (8 oz / 680 g total) packages cream cheese, softened: Forms the creamy, velvety base of the cheesecake filling — essential for that classic cheesecake texture.
- 1 cup (250 g) creamy peanut butter: Adds that smooth, nutty depth that makes this cheesecake truly stand out.
- 1 cup (200 g) granulated sugar: Sweetens the filling and balances the saltiness of the peanut butter.
- 3 large eggs: Helps set the cheesecake and provides structure without sacrificing creaminess.
- ½ cup (120 ml) sour cream: Adds a subtle tang and keeps the cheesecake extra moist and luscious.
- 1 tsp vanilla extract: Enhances all the flavors with a warm, fragrant note.
- 10–12 Reese’s peanut butter cups, chopped: Bursts of peanut buttery, chocolaty goodness throughout the cheesecake filling.
- 1 cup (170 g) semi-sweet chocolate chips: Melts into the perfect silky ganache for a glossy, decadent topping.
- ½ cup (120 ml) heavy cream: Blends with the chocolate chips to create a rich, smooth ganache.
- 2–3 Reese’s peanut butter cups, chopped (for garnish): Adds a playful and delicious finishing touch on top.
How to Make Reese’s Peanut Butter Cup Cheesecake
Step 1: Prepare the Crust
Start by preheating your oven to 325°F (160°C) to get that perfect baking temperature going. Mix the finely crushed Oreo cookies with the melted butter until they’re evenly coated, then firmly press this crumbly mixture into the bottom of your 9-inch springform pan. Baking it for 10 minutes guarantees a crust that’s crisp and holds its shape, providing that satisfying crunch under your creamy cheesecake.
Step 2: Make the Filling
The filling is where the magic happens! First, beat the softened cream cheese until silky smooth — no lumps allowed here for that perfect texture. Blend in the creamy peanut butter and sugar until the mixture is luxuriously creamy. Then, add the eggs one at a time, ensuring each is fully incorporated before adding the next for even baking and richness. Stir in the sour cream and vanilla extract, which add moisture and depth. Finally, gently fold in those chopped Reese’s peanut butter cups to spread little pockets of peanut buttery chocolate bliss through every bite. Pour this heavenly filling over your cooled crust.
Step 3: Bake
Bake your masterpiece for about 55 to 65 minutes, just until the cheesecake’s center is almost set but still slightly wobbly. This ensures it remains rich and creamy after cooling. Once baked, turn off the oven, crack the door open, and let the cheesecake cool inside for an hour to prevent cracking. After this, pop it in the fridge for at least 4 hours or, better yet, overnight. This chilling step helps it set perfectly and allows all the flavors to meld beautifully.
Step 4: Add the Ganache
For the final decadent touch, gently warm the heavy cream until steaming and pour it over the semi-sweet chocolate chips. Let this mixture sit for two minutes, then stir until you have a smooth, glossy ganache. Spread the ganache evenly over the chilled cheesecake, then garnish with extra chopped Reese’s peanut butter cups for that irresistible peanut-chocolate finish that will have everyone asking for seconds.
How to Serve Reese’s Peanut Butter Cup Cheesecake

Garnishes
To showcase the playful peanut butter cup character of the cheesecake, sprinkle some freshly chopped Reese’s cups on top right before serving. For an extra special treat, drizzle a bit of melted peanut butter over the ganache to deepen the peanut buttery flavor and add a fun, artistic swirl that screams indulgence.
Side Dishes
This cheesecake is wonderfully rich, so pairing it with a simple dollop of whipped cream or a scoop of vanilla bean ice cream provides a cooling contrast. Fresh berries like raspberries or sliced strawberries also add a pop of color and a slight tartness that balances the dessert’s sweetness beautifully.
Creative Ways to Present
For parties, serve individual mini cheesecakes in cute jars topped with ganache and Reese’s pieces for portable, personalized treats. Or, try layering slices with peanut butter mousse or chocolate pudding in a parfait glass to build on the Reese’s Peanut Butter Cup Cheesecake flavors with delightful texture variety.
Make Ahead and Storage
Storing Leftovers
Leftover Reese’s Peanut Butter Cup Cheesecake keeps beautifully covered in the fridge for up to 5 days. Make sure it’s sealed tightly to prevent it from absorbing any other fridge odors and to maintain its creamy texture and fresh peanut butter flavor.
Freezing
If you want to enjoy this cheesecake later, it freezes wonderfully. Wrap it tightly in plastic wrap and aluminum foil to avoid freezer burn, then store it for up to 2 months. Thaw it in the fridge overnight before serving to preserve its smooth consistency and delicious flavor.
Reheating
Cheesecake is best served chilled, so reheating isn’t recommended. However, if you want the ganache slightly softened, let the cheesecake sit at room temperature for about 20 minutes; this enhances the creamy texture and makes slicing easier.
FAQs
Can I use crunchy peanut butter instead of creamy?
You can, but creamy peanut butter blends more smoothly into cheesecake, giving you that signature silky texture. Crunchy peanut butter could add an unexpected crunch, which might be nice if you enjoy a bit of texture in your filling.
Do I have to use Oreos for the crust?
Oreos work wonderfully for their chocolate flavor and crispness, but you can swap them out for graham crackers or chocolate wafer cookies depending on your preference. Just be sure to crush them finely and mix well with butter for the perfect base.
How do I prevent cracks on my cheesecake?
One of the best ways to avoid cracks is to bake the cheesecake slowly and avoid overbaking. Cooling it gradually by cracking the oven door and letting it rest inside before refrigeration also helps the cheesecake maintain a smooth top without fissures.
Can I make this cheesecake dairy-free?
It’s tricky because cream cheese, sour cream, and heavy cream are key to the texture here. However, you can experiment with dairy-free cream cheese substitutes and coconut cream, but the flavor and texture will vary. Using vegan peanut butter cups can also help keep it dairy-free.
Is it necessary to chill the cheesecake overnight?
While you can serve it after 4 hours of chilling, letting the cheesecake rest overnight makes a huge difference. It firm ups beautifully and allows the flavors to harmonize for the perfect bite every time.
Final Thoughts
This Reese’s Peanut Butter Cup Cheesecake is one of those desserts that feels like a warm hug after a long day, yet elegant enough to impress any crowd. With its luscious peanut butter creaminess, chocolatey richness, and playful candy surprises throughout, it’s a must-try treat that brings joy to any occasion. So grab your ingredients, preheat your oven, and get ready to create a dessert that will quickly become your go-to favorite!
Your email address will not be published. Required fields are marked *