

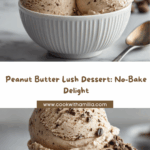
Get ready to fall completely in love with Peanut Butter Lush. This dreamy, no-bake dessert layers chocolatey cookie crust, creamy peanut butter and cream cheese fluff, rich chocolate pudding, and a cloud of whipped topping—plus plenty of fun garnishes. It’s the kind of sweet treat that disappears fast at parties, summer BBQs, or potlucks, and it’s so easy to make ahead. Whether you need a showstopper dessert or simply crave something indulgent and nostalgic, Peanut Butter Lush is destined to become your new go-to.

Ingredients You’ll Need
Simple ingredients come together in a way that truly lets each one shine, giving Peanut Butter Lush its irresistible flavor and texture—plus that signature visual wow factor. Here’s what you’ll need, with a few insider tips along the way!
- Crushed chocolate sandwich cookies: These create a rich, chocolatey base; use a food processor for fine crumbs and maximum crust cohesion.
- Melted butter: Helps bind the cookie crumbs and gives the crust that decadent, buttery bite.
- Creamy peanut butter: The heart of Peanut Butter Lush flavor—stick with the creamy variety for the silkiest possible peanut butter layer.
- Cream cheese: Softened cream cheese brings richness and tang, making the filling light, smooth, and never overly sweet.
- Powdered sugar: This melts seamlessly into the filling, balancing the tartness of the cream cheese and the savoriness of peanut butter.
- Whipped topping (Cool Whip): Gives both the peanut butter layer and topping that airy, luscious finish—plus it’s so easy to work with straight from the tub.
- Instant chocolate pudding mix: The shortcut to a rich, chocolate-pudding middle; make sure to use instant, not cook-and-serve pudding.
- Cold milk: Essential for activating the pudding mix and making sure the layer sets up firm and sliceable.
- Crushed peanuts or chopped peanut butter cups: Optional, but these add just the right hint of crunch and some extra peanut butter pizzazz.
- Chocolate syrup or curls: For that glorious, dessert-shop garnish—take your presentation to the next level!
How to Make Peanut Butter Lush
Step 1: Make the Chocolate Cookie Crust
Start by combining your crushed chocolate sandwich cookies with melted butter in a bowl. Stir until every crumb is glossy—once you press the mixture into a 9×9 baking dish, it should feel moist but not soggy. Pat the crust down firmly with the bottom of a flat measuring cup or glass to ensure it holds together. Pop it in the refrigerator for at least 10 minutes to set up while you prepare the remaining layers.
Step 2: Whip Up the Peanut Butter Layer
In a medium bowl, beat together the softened cream cheese, creamy peanut butter, and powdered sugar until completely smooth and dreamy. This is the star layer of Peanut Butter Lush, so don’t rush it—a hand mixer will make quick work of any lumps. Gently fold in the whipped topping until the mixture is light, fluffy, and cloud-like. Carefully spread it over your chilled crust, reaching all the corners for an even layer.
Step 3: Add the Chocolate Pudding
In a separate bowl, whisk together the instant chocolate pudding mix and cold milk. After about 2 minutes of whisking, you’ll notice the pudding start to thicken nicely—a sign you’re good to go. Pour and spread this chocolatey goodness over the peanut butter layer, smoothing it out with an offset spatula or the back of a spoon for a flawless look.
Step 4: Finish with Whipped Topping
Spread the remaining whipped topping over the chocolate pudding layer, covering the entire surface in a pillowy, snowy finish. This final layer serves as a canvas for all your decorative flair, so don’t be shy!
Step 5: Garnish and Chill
Now’s the time to get creative. Scatter on those crushed peanuts or chopped peanut butter cups, and drizzle with chocolate syrup or artfully arrange chocolate curls. The lush truly comes to life after a good chill—plan to refrigerate for at least 4 hours (overnight is even better) so every layer sets and melds together into sliceable perfection. Cut into squares and let the compliments roll in!
How to Serve Peanut Butter Lush

Garnishes
The magic of Peanut Butter Lush lies in those irresistible toppings. Sprinkle on a handful of chopped peanut butter cups for a decadent finish, or keep it classic with salted, crushed peanuts for crunch. Chocolate syrup, finely shaved chocolate, or even extra cookie crumbs can make each piece look professionally styled. For an added special touch, try a swirl of homemade whipped cream just before serving.
Side Dishes
Because Peanut Butter Lush is so rich and creamy, it pairs perfectly with fresh berries or a fruit salad for a refreshing contrast. A cup of bold coffee or a tall glass of cold milk also complements the dessert’s flavors and will delight the chocolate-and-peanut-butter fans at your table. If it’s a party, a crisp prosecco or a lightly sweet dessert wine can make everything feel even more festive!
Creative Ways to Present
For a playful spin, serve individual parfaits in small mason jars or glasses—just layer smaller amounts for a portable, perfectly portioned treat. If you’re making this Peanut Butter Lush for a birthday or celebration, try using a springform pan for easy removal and beautiful, clean slices. Top each piece with a decorative drizzle or extra candy bits to make it truly Instagram-worthy.
Make Ahead and Storage
Storing Leftovers
Peanut Butter Lush keeps beautifully in the fridge, making it an ideal make-ahead dessert. Simply cover the baking dish tightly with plastic wrap or foil to prevent any fridge odors from seeping in, and store for up to 4 days. The layers stay soft and cohesive, and the flavors only get better as they meld together.
Freezing
Yes, you can freeze Peanut Butter Lush! Wrap individual squares or the whole uncut dessert tightly in plastic wrap and then in foil. Freeze for up to 1 month. For the best texture, let it thaw overnight in the refrigerator before serving. The layers may be a touch softer after freezing, but the dessert will still taste incredible.
Reheating
Since Peanut Butter Lush is a no-bake, chilled dessert, there’s no actual need to reheat it. For the best tasting experience, just let it sit at room temperature for about 10 minutes after removing from the fridge or freezer so every bite is pleasantly creamy and not too cold. If frozen, always thaw first in the refrigerator rather than at room temperature to maintain the lush texture.
FAQs
Can I make Peanut Butter Lush ahead of time?
Absolutely! In fact, making Peanut Butter Lush the day before is ideal because the layers need several hours to chill and set. You can assemble it completely, cover tightly, and refrigerate overnight so it’s ready when you need it.
Does this recipe work with natural peanut butter?
Natural peanut butter tends to separate and can make the filling grainy or oily. For best results and a super silky, stable layer, stick with classic creamy peanut butter that doesn’t need stirring.
What if I don’t have Cool Whip?
You can substitute homemade whipped cream (whip heavy cream with a little powdered sugar until stiff peaks form), but keep in mind that whipped topping is a bit more stable, especially if you plan to make Peanut Butter Lush in advance.
Can I use a different pudding flavor?
Definitely! While chocolate pudding makes for a rich, classic taste, feel free to experiment with flavors like vanilla, white chocolate, or even butterscotch for a fun twist. Each pudding type brings a new dimension to the lush.
How do I keep the layers from mixing together?
The key is to chill the crust first and to gently spread each layer—moving from edge to edge and not pressing too hard. If possible, use an offset spatula for even, delicate layering. Chilling in between steps can also help keep everything nice and defined.
Final Thoughts
If you’re searching for a truly memorable, crowd-pleasing dessert, look no further than Peanut Butter Lush. With its dreamy layers, nostalgic flavors, and pure fun factor, it’s impossible not to smile at the first bite. Give it a try for your next gathering or family night and watch everyone fall just as head-over-heels for it as you will!
Your email address will not be published. Required fields are marked *