

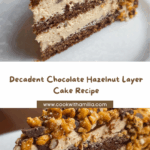
If you have a craving for something truly indulgent and show-stopping, this Heavenly Chocolate Hazelnut Layer Cake is the answer. Imagine rich, moist chocolate cake layers infused with deep cocoa, perfectly balanced by a luscious, whipped cream cheese filling dotted with toasted hazelnuts. Then, it’s all crowned with a glossy melted chocolate drizzle and a generous coat of crunchy hazelnuts that add an irresistible texture contrast. Whether you’re celebrating a special occasion or simply want to treat yourself, this Heavenly Chocolate Hazelnut Layer Cake will quickly become a beloved favorite that you’ll want to bake again and again.

Ingredients You’ll Need
This recipe keeps things delightfully straightforward with staple pantry ingredients that pack maximum flavor and texture. Each element plays an essential role—from the flour and cocoa powder creating a tender cake crumb, to fresh eggs and butter building richness, and finally the hazelnuts adding that signature nutty crunch that makes the cake unforgettable.
- All-purpose flour: The foundation for tender cake layers with just the right crumb.
- Cocoa powder: For deep chocolate flavor and rich color in every bite.
- Sugar: Sweetens the cake and helps achieve a moist texture.
- Butter: Adds richness and keeps the cake incredibly soft.
- Eggs: Bind ingredients together and contribute to the cake’s structure.
- Milk: Moisturizes the batter and smooths out the texture.
- Baking powder: The leavening agent that ensures fluffy, rise-perfect layers.
- Vanilla extract: Enhances all the flavors with a warm, aromatic note.
- Heavy cream: Whipped to create the luscious filling and frosting base.
- Chocolate: Melted and drizzled for a glossy, glamorous finish.
- Hazelnuts: Toasted and chopped for a crunchy coating and flavor burst.
- Cream cheese: Whipped into the filling to add tangy creaminess that balances the chocolate beautifully.
How to Make Heavenly Chocolate Hazelnut Layer Cake
Step 1: Prepare Your Pans and Preheat the Oven
Start strong by preheating your oven to 350°F and greasing your cake pans thoroughly. This essential first step ensures your layers will release perfectly, maintaining those flawless smooth edges we all love in a stunning layer cake.
Step 2: Combine the Dry Ingredients
In a bowl, whisk together the all-purpose flour, cocoa powder, sugar, and baking powder. Getting these dry ingredients evenly mixed guarantees an even chocolate flavor and consistent texture throughout each layer.
Step 3: Cream the Butter, Sugar, Eggs, and Vanilla
Next, cream your butter and sugar until light and fluffy; this builds the cake’s tender crumb. Then, beat in the eggs one at a time, followed by the vanilla extract, allowing the mixture to come together with a rich, velvety texture.
Step 4: Alternate Adding Dry Ingredients and Milk
To create a perfectly smooth batter, add the dry ingredients and milk in alternating portions, mixing gently after each addition. This balances moisture and structure, resulting in cake layers that are moist but still hold their shape beautifully.
Step 5: Bake and Cool the Layers
Pour your batter evenly into the prepared pans and bake for 25 to 30 minutes, until a toothpick inserted comes out clean. Once baked, allow the layers to cool completely on a wire rack to avoid any melting of the filling later on.
Step 6: Whip the Cream Cheese and Heavy Cream Filling
While your layers cool, whip together the cream cheese and heavy cream until fluffy and light. This blend creates a heavenly filling that’s creamy with just the right amount of tang, perfectly complementing the rich chocolate cake.
Step 7: Assemble with Cream Cheese Filling
Spread a generous dollop of the whipped cream cheese mixture between the cooled cake layers, smoothing it out evenly. This layer acts as a luscious, creamy contrast to the chocolate, giving every slice a melt-in-your-mouth experience.
Step 8: Drizzle Melted Chocolate
Melt your chocolate gently and drizzle it artistically over the top of the assembled cake. This glossy avalanche of chocolate not only adds deep flavor but makes the cake visually irresistible—the kind you’ll be proud to show off.
Step 9: Press Chopped Hazelnuts onto the Sides
Finish by coating the cake sides with chopped toasted hazelnuts, pressing them gently into the frosting to create a nutty, crunchy crust that’s as fun to bite into as it is rich in flavor.
Step 10: Chill Before Serving
Pop your Heavenly Chocolate Hazelnut Layer Cake into the fridge for at least an hour before serving. Chilling helps the flavors meld beautifully and firms up the filling and chocolate, making slicing a breeze and presentation flawless.
How to Serve Heavenly Chocolate Hazelnut Layer Cake

Garnishes
While the cake speaks for itself, a few fresh raspberries or a light dusting of powdered sugar can elevate its presentation to next-level gourmet. You might also toss some whole hazelnuts on top for an elegant, rustic touch that hints at the nutty treasure inside.
Side Dishes
This cake pairs wonderfully with a simple cup of rich espresso or a creamy latte, balancing sweetness with a coffee kick. For an adult twist, serve alongside a glass of hazelnut liqueur or dessert wine to deepen the indulgent experience.
Creative Ways to Present
For parties or special celebrations, try slicing the Heavenly Chocolate Hazelnut Layer Cake into petite squares to create a charming dessert platter. Alternatively, serve individual slices with a scoop of vanilla bean ice cream and a drizzle of caramel sauce for a decadent treat sure to impress.
Make Ahead and Storage
Storing Leftovers
Keep your cake covered in an airtight container or wrapped in plastic wrap at room temperature for up to two days to maintain freshness. If your kitchen is warm, the fridge is a safer bet, just bring the slices back to room temperature before enjoying.
Freezing
This Heavenly Chocolate Hazelnut Layer Cake freezes beautifully! Wrap properly in plastic wrap and then foil to prevent freezer burn. Freeze for up to 3 months, and thaw in the fridge overnight for best texture and taste.
Reheating
Because this cake is best served cool, reheating isn’t necessary. If needed, simply let frozen slices thaw and come to room temperature naturally. Avoid microwaving to preserve the filling’s fluffy texture and the cake’s moist crumb.
FAQs
Can I substitute the hazelnuts with another nut?
Absolutely! Pecans, almonds, or walnuts can provide a similar crunchy texture and nutty flavor. Just be sure to toast them lightly for the best taste and enhance that delightful texture contrast.
Is this cake gluten-free?
The recipe calls for all-purpose flour, so it is not gluten-free as written. However, you can try using a gluten-free flour blend in equal amounts for a gluten-free version, keeping an eye on the batter’s consistency as different blends absorb moisture differently.
Can the cake be made dairy-free?
It can with some tweaks! Substitute the butter with a plant-based alternative and use coconut cream instead of heavy cream. For the cream cheese filling, dairy-free cream cheese options work well. Expect slight flavor and texture changes but still delicious.
How many layers does this cake have?
This recipe is designed for two or three layers, depending on your pan size and preference. More layers mean more time, but the indulgence multiplies in every bite!
What’s the best way to toast hazelnuts?
Simply spread hazelnuts on a baking sheet and toast in a 350°F oven for about 8–10 minutes. Watch closely to avoid burning, and once cool, rub the skins off with a clean kitchen towel for a smoother texture and brighter flavor.
Final Thoughts
Whether you’re an experienced baker or just looking to create something special, this Heavenly Chocolate Hazelnut Layer Cake is pure bliss in every bite. Its harmony of rich chocolate, creamy filling, and crunchy nuts makes it a standout dessert sure to charm anyone lucky enough to try it. Don’t hesitate—bake it soon and discover how this cake can brighten any occasion or quiet moment at home.
Your email address will not be published. Required fields are marked *