

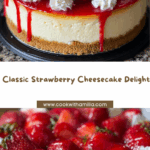
If you’re craving something sweet, creamy, and worthy of a celebration (or just a Tuesday night treat!), the Perfect Strawberry Cheesecake truly earns its name. With a buttery graham cracker crust and a plush cream cheese filling crowned by a glossy, ruby-red layer of strawberries, this dessert is a showstopper. I always turn to this recipe when I want a blend of effortless elegance and dreamy, berry-kissed flavor. It’s not only gorgeous, but every bite is a beautifully balanced harmony of tangy, sweet, and rich—like a love letter to both cheesecake and strawberry season.

Ingredients You’ll Need
Let’s start with the essentials! Each ingredient in this Perfect Strawberry Cheesecake plays a key role, whether it’s lending creaminess, crunch, or that signature fresh strawberry flavor. Get ready to create bakery-quality magic at home with just a few classics!
- Graham cracker crumbs: The foundation for a crunchy, flavorful crust that holds up beneath the creamy filling.
- Granulated sugar: Adds the right amount of sweetness to both the crust and filling, balancing the richness perfectly.
- Unsalted butter: Melted to bind those crumbs into a golden, buttery crust—don’t skimp here!
- Cream cheese: Room-temperature, smooth, and full-fat for that iconic luscious texture.
- Vanilla extract: Just a splash brings out the lovely depth of flavor in every layer.
- Eggs: These provide structure and silkiness—add them one at a time for a supremely smooth batter.
- Sour cream: Delivers tang and a plush creaminess that keeps cheesecake from feeling too heavy.
- Heavy cream: The secret to an ultra-luxurious, melt-in-your-mouth texture.
- Fresh strawberries: The stars of the show, offering natural sweetness and a burst of color on top.
- Strawberry jam (optional): Warmed and brushed over the berries for a glossy, professional finish.
How to Make Perfect Strawberry Cheesecake
Step 1: Prepare the Crust
Preheat your oven to 325°F (163°C). In a bowl, mix the graham cracker crumbs, 1/4 cup of granulated sugar, and melted butter. Stir until the crumbs are evenly moistened, then press the mixture firmly into the bottom of a 9-inch springform pan. Use a flat-bottomed glass to help you get an even layer. This step sets the stage for your Perfect Strawberry Cheesecake, so take a moment to appreciate that irresistible crust-to-be!
Step 2: Make the Cream Cheese Filling
In a large mixing bowl, beat the softened cream cheese with an electric mixer until it’s smooth and creamy—no lumps allowed! Add 1 cup of granulated sugar and the vanilla extract. Continue beating until well combined. This is where the cheesecake magic really starts, with the aroma of vanilla promising something delicious ahead.
Step 3: Incorporate the Eggs
Add the eggs one at a time, mixing gently after each addition. Go slow and steady here—you want everything smooth but you don’t want to whip in too much air, since that can cause cracks later. Incorporating eggs gradually gives your filling that signature silky consistency.
Step 4: Add the Creamy Elements
Mix in the sour cream and heavy cream, blending just until everything is silky and homogenous. Your batter should look glossy and rich. Pour this luscious mixture over your prepared crust and smooth the top gently with a spatula. Admire how dreamy and thick it looks!
Step 5: Bake
Place your pan in the preheated oven and bake for 1 hour 10 minutes to 1 hour 20 minutes. The edges should look set, but the center will still have a gentle jiggle when you nudge the pan. This “just-a-little-jiggle” is the secret to the creamiest Perfect Strawberry Cheesecake imaginable.
Step 6: Cool Gradually
Turn off your oven, crack the door open slightly, and let the cheesecake sit for an hour. This slow cooling helps prevent sudden temperature changes, which can cause cracks. It’s tempting to rush this step, but patience pays off!
Step 7: Chill Overnight
Transfer the cheesecake (still in its pan) to the fridge and chill for at least 6 hours, or preferably overnight. This develops the texture and flavor—trust me, it’ll be totally worth the wait. The next day, you’ll have a Perfect Strawberry Cheesecake that slices like a dream!
Step 8: Top and Decorate
Just before serving, warm your strawberry jam until just liquid and spread it over the cheesecake for a glossy finish. Arrange fresh sliced strawberries on top, and if you’re feeling fancy, add a little whipped cream piping around the edges. Now that’s a dessert worthy of applause!
How to Serve Perfect Strawberry Cheesecake

Garnishes
The simplest way to make your Perfect Strawberry Cheesecake shine is with piles of fresh, vibrant strawberries and a jewel-like jam glaze. I love to add a little extra whipped cream for good measure, or even a few mint leaves for that professional touch and pop of green.
Side Dishes
Keep it light and refreshing—think a simple berry salad, a scoop of raspberry sorbet, or even just a spoonful of lightly sweetened crème fraîche on the side. The creamy, tangy notes of the cheesecake play beautifully with cool or fresh accompaniments that don’t overwhelm the main event.
Creative Ways to Present
For special occasions, try slicing the Perfect Strawberry Cheesecake into minis using a round cutter (for adorable servings!) or layer small cubes into parfait glasses with whipped cream and extra berries. You can even drizzle chocolate or balsamic glaze over the top for an elegant twist that will surprise and delight guests.
Make Ahead and Storage
Storing Leftovers
Leftover cheesecake is a gift—cover it tightly with plastic wrap or transfer to an airtight container, and it will stay perfect in the refrigerator for up to five days. The flavors meld even more as it rests, so you might discover it’s even better the next day!
Freezing
If you want to save some for later, you absolutely can freeze Perfect Strawberry Cheesecake. Wrap slices tightly in plastic and foil, or pop the whole cheesecake (well wrapped) into the freezer for up to two months. Thaw overnight in the fridge before serving for best texture.
Reheating
Chilled cheesecake is best served cold or just slightly below room temperature. If you’d like, let slices sit out for ten to fifteen minutes before serving—this gives the filling a chance to soften and the flavors to shine, no actual heating required!
FAQs
What’s the secret to a creamy Perfect Strawberry Cheesecake?
Avoid overmixing the batter, bring all your dairy ingredients to room temperature, and use the slow oven cooling technique. These tips keep the texture smooth and prevent cracks!
Can I use frozen strawberries for topping?
Fresh strawberries give the best appearance and flavor, but in a pinch, thawed and drained frozen berries will work. Just pat them dry to avoid excess moisture on the surface.
Why did my cheesecake crack?
Cracks often happen from overbaking or rapid temperature changes. Follow the gradual cooling step, and don’t fret—covering with strawberries and glaze beautifully hides any imperfections!
Can I make Perfect Strawberry Cheesecake gluten-free?
Absolutely! Simply swap the regular graham crackers for gluten-free ones. The rest of the ingredients are naturally gluten-free, so you can indulge worry-free.
How far ahead can I make this cheesecake?
You can bake Perfect Strawberry Cheesecake up to two days in advance. Add the fresh strawberries and glaze just before serving for the freshest look and flavor.
Final Thoughts
Nothing brings a table together quite like the arrival of a luscious, stunning slice of Perfect Strawberry Cheesecake. Truly, this dessert is a labor of love that rewards you at every turn—with its beautiful presentation, nostalgic flavors, and the pure satisfaction of making it from scratch. Give it a try, and don’t be surprised if it becomes your new signature treat!
pwk9p9