

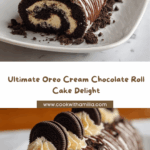
If you love show-stopping desserts that are as fun to make as they are to eat, the Oreo Cream Chocolate Roll should be at the very top of your must-bake list. Imagine a deeply chocolatey, fluffy sponge hugging a luscious, cookies-and-cream filling, swirled together and finished with a snowy drizzle of white chocolate and crunchy bursts of crushed Oreos. This is more than just a cake roll—it’s a joyful celebration of Oreo bliss that’s perfect for birthdays, holidays, or simply satisfying late-night cravings. Trust me, you’ll want to make this Oreo Cream Chocolate Roll again and again!
Ingredients You’ll Need

Ingredients You’ll Need
Let’s talk ingredients: each element in this Oreo Cream Chocolate Roll serves a purpose, delivering everything from sumptuous texture to unforgettable flavor. Best of all, you don’t need anything fussy or hard to find—just a handful of well-loved staples that truly shine together.
- Chocolate cake mix: The base for a quick, moist cake with a beautiful chocolate flavor—feel free to use your favorite homemade chocolate sponge if you prefer.
- Eggs: Three large eggs help the cake rise and provide richness and structure.
- Water: Keeps the batter light and ensures your sponge stays moist and tender.
- Vegetable oil: Adds suppleness and that perfect, melt-in-your-mouth crumb.
- Cream cheese: For the filling, this brings tangy smoothness that balances the sweetness beautifully.
- Heavy cream: Whipped to soft peaks and folded in, it makes the filling ultra-velvety and dreamy.
- Powdered sugar: Sweetens the filling delicately and blends in seamlessly.
- Vanilla extract: A touch of vanilla brings warmth and rounds out all the flavors.
- Oreo cookies: Crushed Oreos transform the filling with their signature crunch and cookie flavor—plus, save a bit for that irresistible topping.
- White chocolate chips: Once melted, they make a gorgeous, sweet drizzle on top of your finished roll.
- Extra crushed Oreos: For a final flourish of cookie magic, don’t skip this garnish!
How to Make Oreo Cream Chocolate Roll
Step 1: Bake the Chocolate Cake
Begin by preheating your oven to 350°F (175°C) and lining a 10×15-inch jelly roll pan with parchment paper. Prepare your chocolate cake batter—go with a boxed mix for speed or whip up your own chocolate sponge for a more homemade touch. Pour the batter into the pan and smooth it evenly for a uniform roll. Bake for 12–15 minutes; you’ll know it’s perfect when a toothpick slides out clean from the center.
Step 2: Shape the Roll
This step is a little bit of baking magic! While the cake is still warm, gently invert it onto a clean kitchen towel that’s been dusted generously with powdered sugar. Carefully peel off the parchment paper. Starting from the short end, roll up the cake together with the towel. This shaping process helps set the cake’s memory so it won’t crack later. Let the rolled-up cake cool completely, resisting the urge to peak!
Step 3: Prepare the Oreo Cream Filling
For the luscious filling, beat softened cream cheese until creamy and smooth, then blend in powdered sugar and pure vanilla extract. In a separate bowl, whip the chilled heavy cream until stiff peaks hold their shape—it should look fluffy and luxurious. Gently fold the whipped cream into the cream cheese mixture to create an ultra-light, cloud-like filling. Finally, fold in plenty of crushed Oreos for unbeatable flavor and crunch in every bite of your Oreo Cream Chocolate Roll.
Step 4: Assemble the Roll
Unfurl your cooled cake roll delicately—don’t worry if the edges look a little soft, that’s part of its charm. Spread the Oreo-laced filling evenly across the surface, making sure to reach all corners for maximum flavor. Gently re-roll the cake, this time without the towel, creating that iconic swirl.
Step 5: Add the White Chocolate Topping and Oreo Garnish
Now, your Oreo Cream Chocolate Roll truly comes to life! Drizzle melted white chocolate in a zigzag over the top, then shower it with extra crushed Oreos for an irresistible cookies-and-cream finish. This final step makes the roll look bakery-beautiful and adds an extra dimension of sweetness and crunch.
Step 6: Chill Before Slicing & Serving
Pop the roll into the fridge for about 30 minutes before slicing. This helps firm up the filling, making it much easier to cut tidy, show-stopping pieces. Now, get ready for “oohs” and “aahs” when you serve it up!
How to Serve Oreo Cream Chocolate Roll
Garnishes
For that true wow factor, garnish each slice of Oreo Cream Chocolate Roll with a few extra crushed Oreos right before serving. If you want something even more decadent, add a sprinkle of mini chocolate chips or shavings of dark chocolate. Fresh mint leaves on the side can add a splash of color and a breath of freshness.
Side Dishes
While this roll cake is definitely the star, it pairs wonderfully with simple sides. A scoop of vanilla or cookies-and-cream ice cream turns dessert into an event. Fresh berries, especially strawberries or raspberries, brighten everything up with their tartness and color. A glass of cold milk or hot coffee is the perfect complement to all that chocolatey, creamy goodness.
Creative Ways to Present
Wow your guests by slicing the Oreo Cream Chocolate Roll into mini rounds and serving them cupcake-style, each nestled in a pretty paper liner. Or, create a dramatic presentation on a long platter with a drizzle of chocolate and a sprinkle of powdered sugar for that “dessert table centerpiece” moment. For birthdays, a few candle-topped slices make a playful twist on classic cake.
Make Ahead and Storage
Storing Leftovers
Any leftover Oreo Cream Chocolate Roll should be kept in an airtight container in the fridge. The roll will stay moist and fresh for up to three days, making it a perfect make-ahead treat for parties or for sweet snacking throughout the week.
Freezing
If you want to make this dessert even farther in advance, the whole roll—filled but undecorated—can be tightly wrapped in plastic and foil, and frozen for up to one month. When you’re ready to serve, thaw in the fridge overnight, then add the white chocolate drizzle and extra crushed Oreos.
Reheating
There’s no need to reheat, as this dessert is served chilled! If you like your Oreo Cream Chocolate Roll extra soft, let a slice come to room temperature for about 15 minutes before enjoying. Just remember to keep the roll refrigerated until serving to maintain the perfect texture.
FAQs
Can I use homemade chocolate sponge instead of cake mix?
Absolutely! Homemade chocolate sponge gives the roll a deliciously rich, customized flavor. Just make sure your recipe yields a flexible cake that rolls well, and bake it in a jelly roll pan for the best results.
Do I have to use white chocolate for the topping?
No worries if you’re not a white chocolate fan—try a dark chocolate drizzle, a simple dusting of powdered sugar, or even a thin layer of chocolate ganache instead. The topping is your playground!
What’s the best way to crush Oreo cookies for the filling?
Place the cookies in a zip-top bag and gently crush them with a rolling pin. You want a mix of fine crumbs and some chunkier bits to keep things interesting and crunchy in the Oreo Cream Chocolate Roll filling.
Can I make Oreo Cream Chocolate Roll gluten-free?
Yes you can! Use your favorite gluten-free chocolate cake mix and gluten-free chocolate sandwich cookies. Just double-check all labels, especially if you’re accommodating allergies, and enjoy!
How far in advance can I make this dessert?
You can prepare the Oreo Cream Chocolate Roll up to 24 hours ahead of time. In fact, a little time resting in the fridge helps the flavors meld and makes for cleaner slices. Hold off on garnishing until just before serving for the freshest look.
Final Thoughts
If you’re ready for a spectacular treat that blends nostalgia, fun, and pure flavor indulgence, the Oreo Cream Chocolate Roll is waiting for you to try it. Gather your ingredients, invite a friend to help, and watch smiles appear with every slice. Enjoy, and don’t forget to share your creations!
Your email address will not be published. Required fields are marked *