

If you’re searching for a dessert that truly wows both coffee and chocolate lovers, look no further than this MOCHA CHOCOLATE MOUSSE CAKE. Piled high with a cloud of rich mocha mousse atop a moist chocolate cake base, this cake offers the perfect balance: deep chocolate, velvet-smooth creaminess, and an irresistible ribbon of bold coffee flavor. Every bite feels like a sophisticated treat—elegant yet indulgent—and it’s surprisingly manageable to make at home. Whether you’re celebrating a special occasion or just treating yourself, this showstopper is guaranteed to impress!

Ingredients You’ll Need
Gathering the right components is essential for a dessert that tastes as heavenly as it looks. Each ingredient in this MOCHA CHOCOLATE MOUSSE CAKE serves a purpose, from building depth in the cake base to creating that lush, airy mousse on top. Ready to whip up some magic? Here’s what you’ll need:
- All-purpose flour: The backbone of a light, tender cake base that supports the creamy mousse.
- Unsweetened cocoa powder: Choose a high-quality cocoa for deep, rich chocolate flavor throughout.
- Baking powder & baking soda: Both work together to give the cake a lovely lift and crumb.
- Salt: Just a pinch brightens all those other flavors—don’t skip it!
- Large eggs: They add structure, richness, and help bind everything together.
- Granulated sugar: Adds necessary sweetness to balance the cocoa and coffee notes.
- Vegetable oil: Keeps the cake moist and tender for days—no dry crumbs here.
- Buttermilk or milk: Buttermilk gives the cake extra tenderness and a subtle tang; milk works beautifully too.
- Vanilla extract: Enhances and rounds out both the chocolate and coffee flavors.
- Hot strong brewed coffee: The secret to deep chocolatey undertones and a true mocha experience.
- Heavy whipping cream (cold): For the mousse—cold cream whips up best and delivers ultimate fluffiness.
- Espresso powder: Infuses the mousse layer with an undeniable coffee kick.
- Semi-sweet or dark chocolate (chopped): Use a chocolate you’d happily eat out of hand—quality matters!
- Granulated sugar (for mousse): Sweetens and smooths out the rich chocolate.
- Egg yolks: Give the mousse a silky, custardy texture without making it heavy.
- Water: Helps ensure the egg mixture cooks gently and combines smoothly.
- Optional toppings—chocolate curls, cocoa powder, whipped cream, coffee beans: All these add flair, elegance, and extra deliciousness to your finished cake.
How to Make MOCHA CHOCOLATE MOUSSE CAKE
Step 1: Bake the Chocolate Cake Base
Begin by preheating your oven to 350°F (175°C) and prepping a 9-inch springform pan—grease it well and line the bottom to ensure easy cake release. Sift together the dry ingredients: flour, cocoa powder, baking soda, baking powder, and salt. This ensures you get a lump-free, even-textured cake. In a separate bowl, whisk together eggs, sugar, oil, milk (or buttermilk), and vanilla extract until creamy and unified. Gently fold in the dry ingredients, mixing just until smooth for a tender crumb. Stir in the hot coffee—don’t worry, the batter will be thin; this is just right for a moist, fudgy cake. Pour the mixture into your prepared pan and bake for 20 to 25 minutes, until a toothpick inserted in the center comes out clean. Allow the cake to cool completely in the pan before moving on.
Step 2: Make the Mocha Chocolate Mousse
The star of this MOCHA CHOCOLATE MOUSSE CAKE is a luscious, fluffy mousse. In a heatproof bowl set over a simmering pot (or a double boiler), whisk together your egg yolks, sugar, water, and espresso powder. Whisk constantly for about 5 to 6 minutes, until the mixture becomes pale, thick, and luscious. Next, stir in the chopped chocolate, letting it melt into the custard until smooth and glossy. Set aside to cool to room temperature—this is important to keep your mousse light. In another chilled bowl, whip the heavy cream to stiff peaks. Fold this whipped cream gently into your cooled chocolate-espresso base. You’ll end up with an airy, cloud-like mousse that’s full of deep mocha flavor.
Step 3: Assemble the Mousse Cake
When the cake base is completely cool (and still nestled in the springform pan), pour the mocha chocolate mousse over the top. Use a spatula to smooth the surface, creating a level, luscious layer. Chill the assembled cake for at least four hours—overnight is even better—to allow the mousse to set fully and the flavors to meld.
Step 4: Decorate & Serve
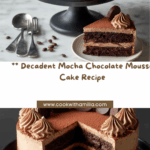
Once set, run a thin knife along the edge and release the springform pan. Now comes the fun: garnish your MOCHA CHOCOLATE MOUSSE CAKE with generous chocolate curls, a dusting of cocoa powder, piped whipped cream rosettes, or whole coffee beans for elegance. Slice with a sharp knife dipped in hot water for those dreamy, clean layers, and serve each piece gloriously chilled!
How to Serve MOCHA CHOCOLATE MOUSSE CAKE

Garnishes
The magic is in the details—top your cake with a blanket of chocolate shavings, a delicate shower of cocoa powder, or rosettes of piped whipped cream. A handful of glossy coffee beans is the perfect finishing touch, making your cake look bakery-worthy and emphasizing the bold flavors within.
Side Dishes
Pair this decadent dessert with a scoop of vanilla ice cream for contrast and luxury, or serve alongside fresh raspberries and a few mint leaves for a pop of color and a touch of tartness to balance the richness. If you’re hosting a dinner, a small demitasse of strong espresso or a chilled glass of milk is the perfect accompaniment to every forkful.
Creative Ways to Present
For a modern twist, cut the MOCHA CHOCOLATE MOUSSE CAKE into petite squares or parfait glasses for individual servings—layer cake cubes and mousse for a playful trifle effect. You can also use a ring mold to create mini cakes for a stunning plated dessert. Don’t be afraid to drizzle with chocolate sauce or a hint of coffee liqueur for extra flair!
Make Ahead and Storage
Storing Leftovers
Keep any leftover slices of MOCHA CHOCOLATE MOUSSE CAKE in the fridge, snugly covered, for up to three days. The mousse stays delightfully creamy, and the flavors become even more harmonious after some resting time.
Freezing
You can absolutely freeze this cake! Simply place individual slices (or the whole cake) in an airtight container. It’ll keep beautifully for up to a month. For best textures, thaw in the refrigerator overnight before serving—no one will guess it’s been frozen!
Reheating
This cake is meant to be enjoyed chilled, so there’s no need for reheating. If frozen, just move it to the fridge until soft enough to slice and serve. The mousse should remain silky and the cake base wonderfully moist.
FAQs
Can I use instant coffee instead of espresso powder in the mousse?
Yes, you can substitute instant coffee for espresso powder, though the flavor may be a bit milder. Dissolve it in the water before adding to the yolks for the best result.
Is it safe to use raw egg yolks in the mousse?
The yolks are gently cooked over a double boiler, which brings them to a safe temperature. Just be sure to constantly whisk and don’t rush the process—you want a silky custard, not scrambled eggs.
Can the MOCHA CHOCOLATE MOUSSE CAKE be made gluten-free?
Absolutely! Simply swap the all-purpose flour for your favorite 1:1 gluten-free blend. The mousse itself is naturally gluten-free already.
What can I use if I don’t have a springform pan?
If a springform pan isn’t handy, you can use a regular round baking pan lined with a parchment “sling” for easier lifting, but be extra careful when unmolding to keep the delicate layers intact.
How far in advance can I make the cake?
This cake is perfect for make-ahead entertaining! Prepare and assemble the day before serving—the mousse will be fully set, and the flavors even more divine.
Final Thoughts
There’s truly nothing quite as satisfying as slicing into this MOCHA CHOCOLATE MOUSSE CAKE and sharing those rich, creamy, mocha-infused layers with loved ones. Whether it’s for an occasion or just to treat yourself, this cake turns any moment into something extraordinary. Give it a try—you’ll be amazed at just how doable and delightful homemade decadence can be!
Your email address will not be published. Required fields are marked *