

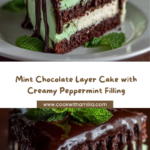
There is something utterly magical about a Mint Chocolate Layer Cake that captures the essence of indulgence and refreshment all at once. This cake is the perfect celebration of rich chocolate layers paired with a luscious mint cream filling, all generously coated with a silky chocolate ganache. Whether you’re a longtime lover of mint and chocolate or just dipping your toes into this delightful combination, this Mint Chocolate Layer Cake is guaranteed to wow your taste buds and impress everyone lucky enough to enjoy a slice.

Ingredients You’ll Need
Gathering your ingredients for this Mint Chocolate Layer Cake might just be the most exciting part because each component plays a crucial role in creating the perfect balance of flavors and textures. From the deep cocoa powder that makes the chocolate layers so moist and rich, to the fresh peppermint extract that gives the cream filling its delightful coolness, every ingredient counts.
- All-purpose flour: The base for tender, fluffy cake layers that hold everything together beautifully.
- Unsweetened cocoa powder: Adds the rich chocolate flavor and dark color to the cake.
- Granulated sugar: Sweetens the cake just right while enhancing the cocoa’s depth.
- Baking powder and baking soda: The duo responsible for making your cake rise to a perfect, light texture.
- Salt: Enhances all the flavors, balancing the sweetness.
- Large eggs: Provide structure and richness within the cake layers.
- Whole milk: Adds moisture and helps create a tender crumb.
- Vegetable oil: Keeps the cake wonderfully moist and soft.
- Vanilla extract: Brings a subtle depth that complements both chocolate and mint.
- Hot coffee: Intensifies the chocolate flavor without making the cake taste like coffee.
- Cream cheese: Creates a creamy, tangy base for the mint filling that’s smooth and rich.
- Unsalted butter: Enhances the mint cream’s silkiness and balance of flavors.
- Powdered sugar: Sweetens the filling while keeping it silky smooth.
- Peppermint extract: Infuses a bright, refreshing mint flavor that pairs perfectly with chocolate.
- Green food coloring (optional): Adds a festive touch by giving the mint cream that classic pale green hue.
- Heavy cream: The key to making a smooth, glossy chocolate ganache coating.
- Dark chocolate: Carefully chopped to melt easily, giving a rich and decadent ganache finish.
How to Make Mint Chocolate Layer Cake
Step 1: Prepare the Cake Layers
Start by preheating your oven to 350°F (175°C) and preparing two 9-inch cake pans with grease and parchment paper to ensure your cakes come out perfectly. Whisk together the dry ingredients—flour, cocoa powder, sugar, baking powder, baking soda, and salt. Then, combine the eggs, milk, vegetable oil, vanilla extract, and hot coffee. Mixing these wet and dry ingredients until smooth creates a rich and luscious chocolate batter that promises heavenly layers.
Step 2: Bake the Cake Layers
Divide the batter evenly between your two prepared pans for consistent thickness and bake for 30 to 35 minutes. You’ll know your cake is ready when a toothpick inserted in the center comes out clean. Let the layers cool completely; this ensures that the mint cream filling doesn’t melt when spread on top.
Step 3: Make the Mint Cream Filling
While the cakes cool, whip together softened cream cheese and butter until silky smooth. Gradually add powdered sugar to avoid lumps, then stir in peppermint extract for that signature minty kick. If you want to add a pop of color, a few drops of green food coloring transform this creamy filling into a vibrant, inviting shade that screams party!
Step 4: Prepare the Chocolate Ganache
Warm the heavy cream until it’s just steaming, then pour it over the finely chopped dark chocolate. Stir gently until the mixture is smooth and glossy. Allow this ganache to cool slightly before pouring it over your assembled cake, ensuring it drapes beautifully and sets perfectly without running off too fast.
Step 5: Assemble the Mint Chocolate Layer Cake
Place one of the cooled chocolate cake layers on your serving plate and spread a generous amount of mint cream filling evenly over the surface. Top it with the second cake layer, pressing down lightly to secure. Pour the slightly cooled ganache over the top, allowing it to drip naturally and elegantly down the sides. Pop your masterpiece into the fridge for at least 30 minutes to set before slicing.
How to Serve Mint Chocolate Layer Cake

Garnishes
Enhance the beauty and flavor of your Mint Chocolate Layer Cake with simple but thoughtful garnishes. Fresh mint leaves add a burst of freshness and a lovely green contrast, while chocolate shavings or curls sprinkle a touch of elegance. Crushed peppermint candies or a light dusting of cocoa powder can also elevate the presentation and add a subtle crunch to each bite.
Side Dishes
This cake is a showstopper all on its own, but pairing it with light accompaniments can make your dessert moment even more special. A scoop of vanilla bean ice cream provides creamy coolness that complements the mint and chocolate, while a fresh berry salad brings bright, tangy notes that cut through the richness. Even a simple cup of hot coffee or mint tea can complete the experience beautifully.
Creative Ways to Present
Looking to impress at your next gathering? Serve the Mint Chocolate Layer Cake on a decorative cake stand for instant sophistication. Slice it into petite squares for a dessert buffet or layer it in individual clear glasses for a beautiful layered dessert parfait. You can also decorate the top with edible gold leaf or colorful sprinkles for a festive vibe that will make everyone eager to try your creation.
Make Ahead and Storage
Storing Leftovers
Leftover Mint Chocolate Layer Cake is best stored in an airtight container in the refrigerator due to the cream cheese filling and ganache topping. This keeps the cake fresh and moist for up to 3 to 4 days, allowing you to indulge in seconds and thirds without sacrificing flavor or texture.
Freezing
If you want to enjoy your Mint Chocolate Layer Cake later, freeze it by wrapping each slice tightly in plastic wrap and then in foil. Store in a freezer-safe container for up to 2 months. When ready to eat, thaw overnight in the refrigerator to maintain its delightful softness and freshness.
Reheating
Since this cake is best enjoyed chilled or at room temperature, avoid microwaving the whole slice as it can affect the texture of the ganache and mint cream. Instead, bring the cake slices to room temperature before serving, which usually takes about 20 to 30 minutes. This way, every bite is as heavenly as the first.
FAQs
Can I use regular milk instead of whole milk?
Absolutely! Regular milk can be used, but whole milk adds extra richness and moisture that slightly enhances the cake’s texture. If you use lower-fat milk, the cake may be a bit lighter but it will still be delicious.
Can I substitute peppermint extract with fresh mint leaves?
Fresh mint leaves provide a natural flavor but won’t have quite the same intense minty punch as peppermint extract. You can infuse cream with fresh mint beforehand for a milder flavor, but extract ensures that recognizable mint taste everyone expects.
Is it okay to omit the green food coloring?
Definitely! The green food coloring is optional and purely decorative. Your mint cream filling will still taste great without it, just a pale cream color instead of the traditional mint green.
Can I make this cake gluten-free?
Yes, you can substitute the all-purpose flour with a gluten-free flour blend of equal measure. Make sure your blend contains xanthan gum or another binder to keep the cake’s texture tender and moist.
How long does this Mint Chocolate Layer Cake stay fresh?
Stored properly in the refrigerator, the cake stays fresh for up to 4 days. For longer storage, freezing is recommended, and it can be enjoyed for up to 2 months with proper thawing.
Final Thoughts
Making this Mint Chocolate Layer Cake is like creating a little celebration for your taste buds and anyone lucky enough to share it with you. Its perfect balance of rich chocolate and refreshing mint, combined with a smooth ganache finish, makes it a true crowd-pleaser. Whether it’s for a family gathering, holiday feast, or simply a treat to brighten your day, I encourage you to try this recipe and revel in every luscious bite.
Your email address will not be published. Required fields are marked *