

“`html
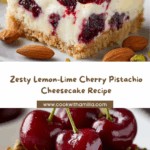
Imagine a cheesecake that bursts with bright, fresh flavors and a delightful crunch in every bite — that’s exactly what you get with the Lemon-Lime Cherry Pistachio Cheesecake. This dreamy dessert perfectly balances the tangy zest of citrus with the sweetness of cherries and the earthy, buttery notes of pistachios all woven into a creamy, smooth cheesecake. It’s a true showstopper for special occasions or any time you want a slice of happiness on your plate.

Ingredients You’ll Need
Gathering the right ingredients is key to creating the vibrant textures and flavors that make this cheesecake so irresistible. Each component plays a crucial role, from the nutty pistachio-studded crust to the luscious citrus-infused filling and the jewel-like cherry topping.
- Graham cracker crumbs: Provide a crunchy, sweet base that’s classic and comforting.
- Finely chopped pistachios: Add a subtle nuttiness and pleasant texture to the crust and garnish.
- Unsalted butter: Helps bind the crust ingredients, creating a rich and buttery foundation.
- Cream cheese: The creamy heart of the cheesecake that gives it that melt-in-your-mouth texture.
- Granulated sugar: Sweetens the crust, filling, and cherry topping perfectly without overpowering.
- All-purpose flour: Stabilizes the cheesecake filling for a smooth slice.
- Eggs: Bind everything together and give structure to the cheesecake.
- Vanilla extract: Enhances the cheesecake with a warm, comforting aroma.
- Lemon and lime zest: Bring bright, fragrant citrus notes that make every bite pop.
- Lemon and lime juice: Infuse fresh acidity to balance the richness of the filling.
- Sour cream: Adds silkiness and a slight tang for added depth.
- Fresh or frozen cherries: Create a luscious topping bursting with fruity sweetness.
- Cornstarch: Thickens the cherry topping, making it glossy and irresistible.
How to Make Lemon-Lime Cherry Pistachio Cheesecake
Step 1: Prepare the Crust
Start by preheating your oven to 325°F (160°C), and get your 9-inch springform pan ready with a light grease and parchment paper lining. Mixing graham cracker crumbs with chopped pistachios, sugar, and melted butter creates a wonderfully crunchy, bittersweet crust. Press this mixture firmly into the pan’s bottom to form an even base, then bake it for about 8 to 10 minutes to set and develop a golden, nutty aroma before letting it cool completely.
Step 2: Make the Cheesecake Filling
In a large bowl, beat softened cream cheese with sugar and flour until it’s perfectly smooth and creamy — this is the luscious heart of your cheesecake. Add eggs one by one, mixing gently to keep the texture silky without overbeating. Stir in vanilla extract and the freshly grated lemon and lime zest along with their juices to infuse the filling with wonderful citrus brightness. Folding in sour cream at the end adds a delicate tang and velvety texture you’ll adore.
Step 3: Bake the Cheesecake
Pour the cheesecake filling onto your cooled crust, smoothing out the top with a spatula. Now, place your springform pan inside a larger roasting pan and carefully pour hot water halfway up the sides of the cheesecake pan to create a gentle water bath — this ensures gentle, even baking that prevents cracking. Bake for 60 to 70 minutes, until the center looks just set but retains a slight jiggle. Let the cheesecake rest in the oven with the door cracked open for an hour, then cool it completely at room temperature before refrigerating for at least 4 hours or overnight so flavors meld and the texture firms up beautifully.
Step 4: Prepare the Cherry Topping
While the cheesecake chills, you can whip up the cherry topping — a simple but stunning layer. Combine cherries, sugar, and lemon juice in a saucepan and cook gently to bring out their natural juices. Toss in a little cornstarch slurry to thicken it into a glossy, luscious topping. Cool it completely before spreading it evenly over the chilled cheesecake to add that vibrant finish.
Step 5: Assemble and Garnish
Once the cherry topping is set, sprinkle chopped pistachios and some lemon and lime zest curls over the top for a pop of color and crunch. The Lemon-Lime Cherry Pistachio Cheesecake is now ready to slice and serve — a true celebration of tart, sweet, and nutty flavors in every bite!
How to Serve Lemon-Lime Cherry Pistachio Cheesecake

Garnishes
Simple yet elegant garnishes elevate the dessert’s appearance and flavor. Fresh cherries placed strategically across the top add beauty and burst, while a sprinkle of extra chopped pistachios brings a delightful crunch. Thin lemon and lime zest curls add a festive and fragrant touch that perfectly complements the cheesecake’s citrus notes.
Side Dishes
This cheesecake pairs wonderfully with light accompaniments that don’t overshadow its bright flavors. A dollop of freshly whipped cream or a scoop of vanilla bean ice cream helps mellow the tanginess while adding creamy richness. A fresh fruit salad featuring berries or kiwi can freshen the palate and keep the theme of refreshing citrus and sweet fruit going strong.
Creative Ways to Present
For an extra-special presentation, consider serving individual mini cheesecakes layered with cherry compote and topped with pistachios in pretty jars or stemmed glasses. Arrange colorful lemon and lime zest curls artistically on top or alongside each slice, and for an elegant touch, drizzle a thin ribbon of cherry syrup around the plate. These small details will wow your guests and make every serving feel like a celebration.
Make Ahead and Storage
Storing Leftovers
Leftover Lemon-Lime Cherry Pistachio Cheesecake should be wrapped tightly with plastic wrap or stored in an airtight container in the refrigerator. It stays fresh for up to 4 days, allowing you to savor the bright citrus and rich creaminess for several days after baking.
Freezing
You can freeze this cheesecake if you want to keep it longer. Wrap it tightly with plastic wrap and then foil to prevent freezer burn. Thaw in the refrigerator overnight before serving — this method preserves flavor and texture beautifully, so every bite tastes just as fresh as the day you made it.
Reheating
Generally, cheesecake is best enjoyed chilled, but if you prefer it slightly warmer, allow slices to sit at room temperature for about 20 minutes before serving. Avoid microwaving, as it can cause the texture to become grainy or melt unevenly; slow warming preserves that luscious creaminess you love in the Lemon-Lime Cherry Pistachio Cheesecake.
FAQs
Can I use frozen cherries for the topping?
Absolutely! Frozen cherries work wonderfully in the cherry topping. Just thaw them slightly beforehand to release their juices, then cook as directed. They often give an even more vibrant flavor and color.
What if I don’t have a springform pan?
A springform pan is ideal for cheesecakes because it makes removal easy without damaging the delicate edges. If you don’t have one, use a cake pan lined with parchment paper that hangs over the edges so you can lift the cheesecake out carefully after chilling.
How do I prevent cracks on the cheesecake surface?
The water bath is your best friend here! It provides steady, gentle heat that reduces cracking. Also, avoid overbaking and do not open the oven door during baking. Cooling the cheesecake slowly by leaving it in the oven with the door slightly open helps too.
Can I substitute pistachios with another nut?
While pistachios offer a unique flavor and color, you can substitute with finely chopped almonds or walnuts if needed. Just keep in mind the pistachios contribute not only taste but the beautiful green contrast that makes this cheesecake visually stunning.
Is the Lemon-Lime Cherry Pistachio Cheesecake suitable for special occasions?
Definitely! Its elegant presentation and harmonious flavors make it perfect for birthdays, holidays, or anytime you want to impress your friends and family with a luxurious, homemade dessert.
Final Thoughts
Making the Lemon-Lime Cherry Pistachio Cheesecake is like crafting a little piece of joy that brings brightness and sweetness to your table. It’s a wonderful way to celebrate flavors that sparkle with freshness and richness all at once. I can’t wait for you to try this recipe and feel the same love for it that I do — enjoy every luscious bite!
“`
Your email address will not be published. Required fields are marked *