

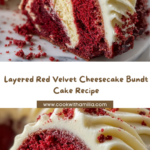
Get ready to fall in love with the decadent marriage of two classic desserts in one beautiful treat! This Layered Red Velvet Cheesecake Bundt Cake brings together the moist, tender crumb of red velvet cake with a rich, creamy cheesecake center, all baked in a stunning bundt shape that’s perfect for any occasion. Every bite offers a delightful contrast of textures and flavors, making it an irresistible showstopper that will charm your family and friends from the first forkful.

Ingredients You’ll Need
These ingredients are simple pantry staples, yet each plays a crucial role in creating the perfect balance of luscious cheesecake and tender red velvet cake. The combination of cream cheese, cocoa, and red food coloring works harmoniously to give this bundt cake its signature flavor and color.
- 8 oz cream cheese: Softened for smooth, creamy cheesecake filling that melts in your mouth.
- 1/4 cup sugar (for cheesecake): Adds just the right touch of sweetness to the filling.
- 1 egg (for cheesecake): Helps bind the cheesecake filling for a silky texture.
- 1 tsp vanilla extract (for cheesecake): Enhances the richness of the cream cheese layer.
- 3 cups flour: Provides the structural base for the moist red velvet cake.
- 1 1/4 cups sugar (for cake): Sweetens the cake without overpowering the delicate cocoa flavor.
- 1 tbsp + 1 tsp cocoa powder: Imparts the subtle chocolate undertone classic to red velvet.
- 1 tsp baking soda: Gives the cake its tender crumb and light rise.
- 1 cup oil: Keeps the cake moist and soft throughout.
- 3/4 cup buttermilk: Adds a slight tang and helps activate the baking soda.
- 1 tsp vanilla extract (for cake): Deepens the flavor of the red velvet layers.
- 2 eggs (for cake): Bind the cake batter and add richness.
- 1 oz red food coloring: Gives the iconic vibrant red that makes this cake visually stunning.
- 2 tsp vinegar: Reacts with baking soda to create a light, tender crumb.
- 1 1/2 cups powdered sugar (for glaze): Sweet and smooth, perfect for a delicate drizzle.
- 3 tbsp milk: Thins the glaze to just the right consistency for drizzling.
- 1/2 tsp vanilla extract (for glaze): Adds a subtle aromatic touch to the finishing glaze.
How to Make Layered Red Velvet Cheesecake Bundt Cake
Step 1: Prepare Your Oven and Pan
Start by preheating your oven to 350°F (175°C). Grease and flour a bundt pan thoroughly to ensure your cake releases beautifully when baked. This step is key to maintaining the elegant shape of your Layered Red Velvet Cheesecake Bundt Cake.
Step 2: Mix the Cheesecake Filling
In a medium bowl, beat together the softened cream cheese, sugar, one egg, and vanilla extract until the mixture is smooth and creamy. This rich filling will be nestled right in the center of your cake, so make sure it’s well combined with no lumps.
Step 3: Combine Dry Ingredients for the Cake
Whisk together the flour, sugar, cocoa powder, and baking soda in a large bowl. These dry ingredients form the base for the velvety red velvet cake layers that will surround the cheesecake in this bundt masterpiece.
Step 4: Mix the Wet Ingredients for the Cake
In a separate bowl, whisk together the oil, buttermilk, vanilla extract, eggs, red food coloring, and vinegar until everything is well incorporated. This mix not only brings vibrant color but also ensures your cake is moist and flavorful.
Step 5: Combine Wet and Dry Ingredients
Gradually add the wet mixture to the dry ingredients, stirring gently until just combined. Be careful not to overmix—the batter should remain airy and light, setting the stage for a tender crumb in your Layered Red Velvet Cheesecake Bundt Cake.
Step 6: Layer the Batter and Cheesecake Filling
Pour half of the red velvet cake batter into your prepared bundt pan. Spoon the cheesecake filling evenly over the batter, taking care not to disturb the edges. Then, gently cover the filling with the remaining cake batter, sealing in that luscious cheesecake center.
Step 7: Bake to Perfection
Bake the cake in your preheated oven for 55 to 60 minutes, or until a toothpick inserted in the center comes out clean. Once baked, allow the cake to cool for about 10 minutes in the pan before carefully turning it onto a wire rack to cool completely. This resting period is crucial for that perfect slice.
Step 8: Prepare and Add the Glaze
Whisk together powdered sugar, milk, and vanilla extract until the glaze is smooth and pourable. Once your cake is fully cooled, drizzle this sweet glaze over the top to add a lovely finishing touch that complements every bite.
How to Serve Layered Red Velvet Cheesecake Bundt Cake

Garnishes
Adding a few simple garnishes can elevate the presentation and flavor of your Layered Red Velvet Cheesecake Bundt Cake. Fresh raspberries or sliced strawberries add a burst of fruity freshness and color contrast, while a sprinkle of white chocolate shavings or chopped pecans brings texture and extra indulgence.
Side Dishes
This cake pairs wonderfully with a scoop of vanilla ice cream or a dollop of lightly whipped cream to balance the richness. A cup of freshly brewed coffee or a glass of cold milk also complements the cake’s creamy and chocolaty layers perfectly, making the experience even more comforting.
Creative Ways to Present
Present your Layered Red Velvet Cheesecake Bundt Cake on a beautiful cake stand to showcase its striking layers and elegant shape. For special occasions, consider dusting it lightly with cocoa powder or powdered sugar along with edible gold leaf accents for a wow-worthy dessert centerpiece.
Make Ahead and Storage
Storing Leftovers
This cake stays moist and delicious for up to 3 days when stored in an airtight container in the refrigerator. Keep the glaze covered to prevent it from drying out, and always slice with a clean knife to maintain those perfect layers.
Freezing
You can freeze slices of the Layered Red Velvet Cheesecake Bundt Cake by wrapping them tightly in plastic wrap, then placing them in a freezer-safe bag or container. Thaw overnight in the refrigerator for a ready-to-enjoy treat that tastes just as wonderful as fresh.
Reheating
For the best experience, enjoy the cake chilled or at room temperature. If you prefer a slightly warmed slice, microwave it for 15 to 20 seconds—just enough to soften the cream cheese filling without altering the textures.
FAQs
Can I use a different pan instead of a bundt pan?
Absolutely! While a bundt pan gives this cake its signature look, you can use a tube pan or even a springform pan. Just adjust baking time accordingly and keep an eye on the doneness with a toothpick test.
Is there a substitute for buttermilk?
Yes, you can make a simple buttermilk substitute by adding 1 tablespoon of vinegar or lemon juice to 3/4 cup of milk. Let it sit for 5 minutes before using. This trick preserves the tang and acidity needed for the cake’s rise and flavor.
Can I make this cake dairy-free?
With some ingredient swaps like dairy-free cream cheese and milk alternatives, you can adapt this recipe, though the texture and flavor might be slightly different. Using high-quality dairy-free products works best for taste and consistency.
How do I prevent the cheesecake filling from mixing into the cake batter?
Spoon the cheesecake filling gently over the first layer of batter and avoid swirling or spreading it too aggressively. Carefully adding the remaining batter on top ensures the filling layers stay distinct when baked.
Why does the cake need vinegar?
Vinegar reacts with baking soda to create bubbles in the batter, producing a soft, tender crumb and helping the cake rise. It also enhances the brightness of the red color in the red velvet cake layers.
Final Thoughts
This Layered Red Velvet Cheesecake Bundt Cake is truly a dessert crafted from love, combining vibrant color, indulgent textures, and unforgettable flavors into one stunning creation. Whether for a celebration or a special treat, baking this cake is sure to make your kitchen smell like happiness and fill your heart with joy. Give it a try—you’ll keep coming back to this recipe time and time again!
Your email address will not be published. Required fields are marked *