

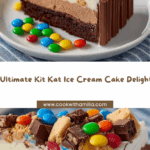
If you’re looking for a show-stopping dessert that puts a huge smile on everyone’s face, the Kit Kat Ice Cream Cake is your go-to. Imagine a border of crisp Kit Kats, a base of fudgy brownies, two layers of dreamy ice cream, luscious chocolate ganache, and just the right touch of mint and chocolate crunch. It’s a celebration in cake form, perfect for holidays, birthdays, or those “just because” days when only the most fun dessert will do.

Ingredients You’ll Need
This Kit Kat Ice Cream Cake comes together with a handful of favorites that work magic together. Each one is key—bringing a pop of texture, a layer of flavor, or that essential wow factor to each bite.
- Brownies (300 g, baked and cooled): Crumble these for a rich, chewy base that holds everything together and adds decadence in every forkful.
- Kit Kat bars (16 whole, 4 chopped): The whole Kit Kats make a gorgeous cake border, while the chopped ones give surprising crunch in the middle.
- Mint chocolate chip ice cream (450 ml/2 cups, softened): This layer is creamy, minty, and loaded with chocolate bits for an extra burst of flavor.
- Chocolate ice cream (450 ml/2 cups, softened): Classic and velvety, this balances the mint and delivers the ultimate chocolate hit.
- Chocolate ganache (200 g): Adds silkiness and a glossy finish—make yours by blending warm heavy cream and melted chocolate until smooth.
- Peppermint candies (80 g, crushed): Sprinkle these on top for a frosty, festive crunch and a pop of color.
- Dark chocolate shavings (50 g): For beautiful, dramatic flair atop your cake—plus extra chocolate never hurts!
How to Make Kit Kat Ice Cream Cake
Step 1: Prepare the Brownie Base
Start by crumbling your cooled brownies into small, bite-sized pieces. You want them small enough to press down evenly, but not so fine they turn into a paste. Pour the brownie crumbs into a 9-inch springform pan lined with parchment, then press them with your hands or the back of a spoon to create an even base. This fudgy layer will set the stage for every delicious bite of your Kit Kat Ice Cream Cake.
Step 2: Line with Kit Kat Bars
Take your whole Kit Kat bars and stand them upright around the inside edge of the springform pan. Gently press each bar into the brownie base to anchor it. Work your way around so you get that signature Kit Kat border—don’t worry if there’s a slight gap here or there. Pop the whole pan in the freezer for 15 minutes to help everything firm up.
Step 3: Add the Mint Chocolate Chip Ice Cream
Once the base is chilled, grab your softened mint chocolate chip ice cream. Spread it carefully over the brownies, smoothing it all the way to the Kit Kat sides. Give it a little time to settle, then pop the pan back in the freezer for 1 to 2 hours so this layer gets nicely set. The minty freshness with the chocolate chunks is a game changer!
Step 4: Chocolate Ganache & Chopped Kit Kats
Drizzle half of your silky chocolate ganache over the frozen mint layer. Then, scatter the chopped Kit Kat pieces right on top of that ganache. This creates a chocolatey, crunchy surprise with every slice of Kit Kat Ice Cream Cake. Layering the textures makes this cake irresistible.
Step 5: Layer the Chocolate Ice Cream
Spread the softened chocolate ice cream over everything, taking care to smooth it out gently to avoid disturbing the Kit Kat pieces below. This rich chocolate layer brings depth and doubles down on your chocolate dreams. Freeze the whole cake for another 2 hours to get a perfect set for the final decorations.
Step 6: Decorate and Freeze
Pour the remaining ganache over the top, letting it spread and drip a bit for dramatic effect. Sprinkle the crushed peppermint candies and dark chocolate shavings over the ganache, creating a festive and inviting finish. Slide the entire cake back into the freezer and let it chill overnight—the flavors mingle, and the texture sets beautifully.
Step 7: Slice and Enjoy
When it’s time to serve, run a sharp knife under hot water and wipe it dry between slices. This simple trick will help you get those perfect, crisp wedges every time, with clear layers and glossy Kit Kat edges. Serve immediately and watch eyes light up!
How to Serve Kit Kat Ice Cream Cake

Garnishes
Dressing up your Kit Kat Ice Cream Cake with a few extra touches is half the fun! Along with the peppermint and chocolate shavings, you can add a dollop of whipped cream or scatter some extra Kit Kat miniatures on the serving plate. A drizzle of chocolate or caramel sauce just before serving makes it even more inviting.
Side Dishes
This cake is a showstopper all on its own, but if you want to create a full dessert spread, pair each slice with a handful of fresh berries or a scoop of whipped topping. A hot cup of espresso or a glass of cold milk perfectly balances the richness and gives every bite a nostalgic twist.
Creative Ways to Present
Presentation takes this cake from great to downright unforgettable! Stack petite slices for a dessert platter, decorate each plate with a swirl of ganache, or serve as personalized mini cakes using a muffin tin. You can even wrap slices in colorful parchment for grab-and-go summer treats at parties or picnics.
Make Ahead and Storage
Storing Leftovers
If you have extra Kit Kat Ice Cream Cake, wrap individual slices in plastic wrap and store them in a tightly sealed container in the freezer. This not only locks in freshness but also prevents any freezer odors from sneaking in. The cake stays delicious and ready-to-enjoy for up to a week, making midnight treats or surprise guests a joy.
Freezing
This dessert is made for freezing! Assemble and decorate your Kit Kat Ice Cream Cake, then let it set overnight or even up to a few days in advance. Allow the cake to sit at room temperature for a couple of minutes before slicing for the ideal texture and flavor balance, and always keep it well-covered to prevent freezer burn.
Reheating
Since this is an ice cream cake, reheating isn’t necessary, but if your cake has gotten too firm, simply let it rest at room temperature for 5 to 10 minutes before slicing. This softens it just enough for smooth, easy serving—no microwaves needed, just a bit of patience!
FAQs
Can I use other ice cream flavors in this Kit Kat Ice Cream Cake?
Absolutely! While mint chocolate chip and chocolate are a classic, you can swap in cookies and cream, caramel swirl, or even strawberry for a whole new twist. Pick your favorites to make the cake uniquely yours.
How do I make the chocolate ganache?
You only need two ingredients: heavy cream and chocolate. Warm the cream just to a simmer, pour it over chopped chocolate, let it sit for a minute, then stir until silky smooth. Cool to room temperature before using on your Kit Kat Ice Cream Cake.
Is it possible to make this cake without a springform pan?
While a springform pan gives you that classic cake shape and easy removal, you can use a deep cake pan lined with parchment paper. Just leave extra parchment hanging over the edges so you can lift the whole cake out once it’s frozen solid.
What’s the best way to cut clean slices?
Run a sharp knife under hot water, wipe it dry, and slice through the frozen Kit Kat Ice Cream Cake. The warmth helps glide through the layers and the Kit Kat border, giving you picture-perfect wedges.
Can this be made ahead for parties?
Yes! That’s one of the biggest perks of this cake. Assemble and freeze it the night before your party or gathering. Decorate just before serving for the freshest appearance and maximum wow factor.
Final Thoughts
This Kit Kat Ice Cream Cake is as fun to make as it is to eat, and it’s guaranteed to be the talk of every dessert table. If you love cool, creamy layers and the unmistakable crunch of Kit Kats, don’t wait—give this recipe a try and surprise your friends and family with something memorably delicious!
vj5i6i