

If you have a soft spot for classic holiday treats that bring cheer with every bite, this Homemade Christmas Mints recipe is exactly what your festive season needs. These melt-in-your-mouth little bites are creamy, minty, and bursting with holiday colors that feel just as joyful as they taste. Whether you’re preparing for a party, looking for a thoughtful handmade gift, or adding a sweet note to your after-dinner spread, these mints come together effortlessly and delight everyone lucky enough to try them. Let me walk you through making these charming, vibrant mints that transform simple ingredients into seasonal magic.

Ingredients You’ll Need
Every ingredient in this recipe plays a crucial role in creating that perfect minty flavor and creamy texture you’ll adore. They’re simple pantry staples, yet combined, they turn into festive delights bursting with color and smoothness.
- ⅓ cup granulated sugar: Adds just the right amount of sweetness and helps balance the creamy base.
- 4 ounces cream cheese, room temperature: Provides the rich, smooth texture essential for melt-in-your-mouth mints.
- 2 tablespoons unsalted butter, room temperature: Brings a lovely richness and helps with the dough’s softness.
- 2 tablespoons light corn syrup: Adds smoothness and stickiness that hold the mints together perfectly.
- 1 teaspoon peppermint extract: The star flavor that gives these mints their crisp, refreshing taste.
- 4¼ to 5 cups powdered sugar, divided: Key for sweetness and firming up the dough to the ideal consistency.
- 6 drops green liquid food coloring: Brings festive color without changing the flavor, perfect for Christmas vibes.
- 6 drops red liquid food coloring: Adds another classic holiday shade to make your mints pop.
How to Make Homemade Christmas Mints recipe
Step 1: Combine the creamy base
Start by placing the granulated sugar, softened cream cheese, butter, light corn syrup, and peppermint extract into a large mixing bowl. Beat these ingredients together until you get a smooth and creamy mixture that spells holiday magic. This base is what makes your mints wonderfully soft and flavorful.
Step 2: Incorporate the powdered sugar
Gradually add about 3½ cups of powdered sugar into the creamy mixture, beating thoroughly after each addition. The goal is to form a firm dough that still feels pliable and not overly sticky. You might need to sprinkle in a little extra powdered sugar to get the perfect texture for rolling and shaping later on.
Step 3: Divide and color
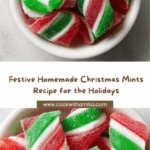
Once your dough looks just right, split it into three equal parts. Leave one portion plain white to keep that classic look, mix green food coloring into the second portion, and blend red into the third. This layering of colors is what makes these mints stand out on any holiday platter.
Step 4: Roll out and cut
Place each colored dough between two sheets of wax paper and roll it out until it’s around ¼ inch thick. Use a small round cookie cutter or even the rim of a drinking glass to cut out little circles from each dough color. These perfectly round shapes prepare you to assemble your festive mints.
Step 5: Assemble and chill
To create those beautiful mints, gently press one circle of each color together, layering or patterning as you please. Pop them onto a baking sheet lined with wax paper and refrigerate for at least one hour—this step is key to firming up the mints so they hold their shape and texture perfectly.
How to Serve Homemade Christmas Mints recipe

Garnishes
Freshen up the presentation with a small sprig of peppermint or a sprinkle of edible glitter for a magical, snowy effect. These simple touches can elevate your mints from tasty treats to charming holiday décor that catches everyone’s eye.
Side Dishes
Pair your mints with a cozy cup of hot chocolate, spiced cider, or fresh coffee to balance the cool peppermint with warm sips. They also work wonderfully as a palate cleanser alongside rich holiday desserts or after a hearty meal.
Creative Ways to Present
Try stacking the mints in clear glass jars tied with festive ribbon for delightful homemade gifts. Alternatively, arrange them on a holiday-themed tray with other colorful candies to create an inviting candy buffet that will be the center of your party.
Make Ahead and Storage
Storing Leftovers
Keep your Homemade Christmas Mints recipe fresh by storing them in an airtight container inside the refrigerator. Properly stored, they’ll maintain their delightful texture and flavor for up to two weeks, making them perfect for preparing ahead of busy holiday days.
Freezing
If you want to keep these mints longer, they freeze beautifully. Arrange the mints on a parchment-lined tray to freeze individually before transferring them to a freezer-safe container. Thaw them in the fridge overnight before serving for best results.
Reheating
Since these mints are best enjoyed chilled and delicate, reheating is not recommended. Instead, simply take them out of the fridge a few minutes before serving to let them soften slightly and enhance their creamy texture.
FAQs
Can I use gel food coloring instead of liquid?
Absolutely! Gel food coloring tends to give a more vibrant color without changing the dough’s texture, making it an excellent choice for bright and festive mints.
How long do these mints keep?
Your Homemade Christmas Mints recipe will stay fresh and tasty for about two weeks when stored properly in an airtight container in the refrigerator.
Can I substitute peppermint extract with another flavor?
Yes, you can experiment with different extracts like vanilla or almond, but peppermint is classic and key to that holiday mint flavor everyone loves.
Is it necessary to refrigerate the mints?
Refrigerating helps the mints set properly and maintain their shape and texture. It also keeps them fresh longer, especially if you’re preparing them a few days in advance.
What’s the best way to gift these mints?
Wrapping each mint individually in wax paper or packing them in decorative tins or jars makes for charming, homemade gifts that are sure to impress friends and family.
Final Thoughts
I hope this Homemade Christmas Mints recipe brings as much joy to your kitchen as it has to mine over the years. These little bursts of creamy, minty goodness are perfect for sharing, gifting, or simply savoring during the busy holiday season. Give them a try—you’ll find they’re as fun to make as they are to eat.
Your email address will not be published. Required fields are marked *