

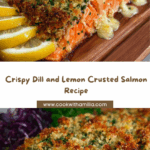
If you are craving a dish that bursts with brightness and freshness, you will absolutely adore this Dill and Lemon Crusted Salmon. It’s wonderfully simple yet incredibly flavorful, combining tender, flaky salmon with a zesty crust made from fresh dill, lemon zest, and crunchy panko breadcrumbs. This recipe delivers a perfect balance of herbal aroma, citrus tang, and satisfying texture that makes dinner feel like a special occasion any night of the week.

Ingredients You’ll Need
Each ingredient in this Dill and Lemon Crusted Salmon recipe plays an essential role, coming together to create a mouthwatering experience. From the rich olive oil that keeps the salmon moist to the fresh dill and lemon zest that brighten every bite, these components are both straightforward and impactful.
- Salmon fillets: Choose fresh, skinless fillets about 6 ounces each for the best flaky texture.
- Olive oil: A light brush of olive oil helps the topping stick and adds subtle, fruity richness.
- Garlic, minced: Just two cloves provide a lovely aromatic base without overpowering the fish.
- Lemon zest: The zest of one lemon brings a fresh, bright citrus note that livens the crust.
- Fresh dill, chopped: Dill’s distinctive herbal flavor complements salmon perfectly and keeps the dish vibrant.
- Panko breadcrumbs: These coarse crumbs add an irresistible crunch to the topping.
- Salt and pepper: Simple seasoning enhances all the flavors without overshadowing the freshness.
- Lemon wedges: For serving, they add an extra pop of citrus and a beautiful finishing touch.
How to Make Dill and Lemon Crusted Salmon
Step 1: Preheat the Oven
Begin by setting your oven to 400°F (200°C). Prepare your baking sheet by lining it with parchment paper or giving it a light grease to prevent sticking. This step ensures your salmon cooks evenly and the crust crisps up beautifully.
Step 2: Prepare the Topping
In a small bowl, combine the minced garlic, lemon zest, chopped fresh dill, panko breadcrumbs, salt, and pepper. Mixing these ingredients first allows all the flavors to meld together, creating that irresistible crust that defines this dish.
Step 3: Prepare the Salmon
Brush each fillet generously with olive oil. This not only helps the topping adhere but also adds a luscious richness to the fish. Press the dill and lemon breadcrumb mixture firmly and evenly over the top of each salmon fillet. Don’t be shy—the more even the coating, the better the crust texture.
Step 4: Bake the Salmon
Place the prepared salmon fillets onto the baking sheet and pop them in the oven. Bake for about 12 to 15 minutes, until the salmon is cooked through and flakes easily with a fork. During this time, the topping will develop a gorgeous golden crust that’s crisp and aromatic.
Step 5: Serve with Lemon Wedges
Once out of the oven, your Dill and Lemon Crusted Salmon is ready to shine. Serve immediately with lemon wedges on the side. The fresh lemon juice squeezed over the top brings that final burst of brightness to the dish.
How to Serve Dill and Lemon Crusted Salmon

Garnishes
To make your Dill and Lemon Crusted Salmon even more appetizing, add a sprinkle of fresh dill right before serving. A little extra lemon zest or thin lemon slices can also enhance the presentation and flavor.
Side Dishes
This salmon pairs beautifully with light, fresh side dishes such as steamed asparagus, a crisp green salad, or herbed quinoa. Roasted potatoes with garlic or a simple couscous salad also make delicious complements, rounding out the meal without competing with the salmon’s bright profile.
Creative Ways to Present
For an elegant touch, plate the salmon over a bed of lemon-infused risotto or alongside a colorful vegetable medley. You can even serve it cold on top of a mixed green salad for a refreshing lunch option. Whatever you choose, the Dill and Lemon Crusted Salmon always steals the spotlight.
Make Ahead and Storage
Storing Leftovers
If you have leftovers, store the salmon in an airtight container in the refrigerator. It will stay fresh for up to 2 days, retaining much of its delicious flavor and texture.
Freezing
You can freeze cooked salmon, but the crispy crust may lose some of its crunch after thawing. Wrap the fillets tightly in plastic wrap and foil, or use a freezer-safe container to prevent freezer burn. Consume within one month for best quality.
Reheating
To reheat your Dill and Lemon Crusted Salmon, gently warm it in a low oven (around 300°F / 150°C) for 10 minutes to help maintain the crust’s crispness. Avoid the microwave if possible, as it tends to soften the topping and make the fish less appealing.
FAQs
Can I use frozen salmon for this recipe?
Yes, you can use frozen salmon but make sure to thaw it completely and pat it dry before applying the topping for the best results.
Is fresh dill necessary, or can I use dried dill?
Fresh dill gives the best flavor and texture for this dish, but in a pinch, dried dill can be used. Use about one-third of the amount since dried herbs are more concentrated.
Can I prepare the breadcrumb topping in advance?
Absolutely! You can mix the topping a few hours ahead and keep it covered in the fridge until you’re ready to assemble the salmon.
What if I don’t have panko breadcrumbs?
Regular breadcrumbs work fine, although they won’t be quite as crunchy. You could also try crushed crackers or even finely chopped nuts for an interesting twist.
How do I know when the salmon is perfectly cooked?
Look for the salmon to flake easily when you gently press it with a fork. The flesh should be opaque and moist, not translucent or dry.
Final Thoughts
You really can’t go wrong with Dill and Lemon Crusted Salmon—it’s a spectacular way to enjoy fresh salmon that’s bursting with flavor and texture. Whether you’re cooking for family, friends, or just yourself, this dish feels special while being surprisingly easy to put together. I promise once you try it, it will quickly become one of your go-to salmon recipes. So grab those simple ingredients and get cooking—you’re in for a treat!
Your email address will not be published. Required fields are marked *