

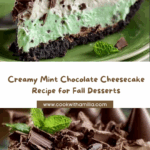
If you have a soft spot for desserts that combine rich, velvety textures with refreshing flavors, then this Creamy Mint Chocolate Cheesecake will quickly become your new obsession. Imagine a luscious chocolate crust cradling a smooth, mint-infused cheesecake filling, all topped with a glossy peppermint ganache that melts in your mouth with every bite. This dessert is not just a treat; it’s an experience that dances between indulgent chocolate notes and the cool brightness of mint, making every forkful an irresistible delight.

Ingredients You’ll Need
The magic of this Creamy Mint Chocolate Cheesecake starts with simple, quality ingredients that come together perfectly to create its distinct flavor and texture. Each element plays a vital role—from the crunchy chocolate cookie base to the melt-in-your-mouth filling, topped off by a decadent ganache finish.
- Chocolate cookie crumbs: Use chocolate sandwich cookies for a sturdy, flavorful crust that complements the minty filling.
- Unsalted butter: Helps bind the crust together and adds rich depth without overpowering flavor.
- Cream cheese: The creamy heart of the cheesecake; make sure it’s softened for smooth mixing.
- Granulated sugar: Sweetens the filling naturally, balancing the cocoa’s bitterness.
- Brown sugar: Adds a subtle molasses note that enhances the cheesecake’s complexity.
- Cocoa powder: Provides a deep chocolate flavor, essential for that rich character.
- Eggs: Create structure and richness, ensuring a perfect set without cracks.
- Sour cream: Adds tanginess and moisture, keeping the cheesecake silky and tender.
- Vanilla extract: A classic flavor enhancer that brightens the overall taste.
- Peppermint extract: Gives the cheesecake its signature minty freshness—don’t skip this!
- Semi-sweet chocolate chips: Melted into the filling to amplify chocolate intensity.
- Heavy cream: For a luscious ganache that sits beautifully atop the cheesecake.
- Chopped semi-sweet chocolate: Blended into the ganache for smooth decadence.
- Whipped cream, fresh mint leaves, chocolate shavings: Garnishes that elevate both appearance and flavor.
How to Make Creamy Mint Chocolate Cheesecake
Step 1: Prepare the Crust
Start by preheating your oven to 325°F (160°C) and greasing a 9-inch springform pan. Wrap the outside of the pan with aluminum foil to prevent any water leakage from the water bath during baking. Mix the chocolate cookie crumbs with melted butter until they resemble wet sand, then press this mixture firmly into the bottom of your prepared pan. This sturdy base will hold the creamy filling perfectly.
Step 2: Make the Cheesecake Filling
The filling is the star of the show. Beat softened cream cheese until absolutely smooth, then add granulated sugar, brown sugar, and cocoa powder. Once everything is blended well, incorporate the eggs one at a time, beating thoroughly after each addition to keep the texture flawless. Stir in sour cream, vanilla, and peppermint extracts for that unmistakable fresh flavor. Finally, fold in the melted chocolate chips for an extra layer of chocolate richness.
Step 3: Bake in a Water Bath
Pour the cheesecake filling evenly over your prepared crust. Place the springform pan inside a larger roasting pan, then carefully pour hot water into the roasting pan about halfway up the sides of the cheesecake pan. Baking the cheesecake this way ensures gentle, even heat that helps avoid cracks and keeps the texture creamy and tender. Bake for 70-80 minutes until the center is just set and the top shows a slight puff.
Step 4: Cool and Chill
Remove the cheesecake from the water bath and let it come to room temperature. Then, refrigerate it for at least 4 hours or overnight to develop the perfect luscious texture and solidify the flavors beautifully.
Step 5: Prepare the Peppermint Chocolate Ganache
Heat heavy cream over medium heat until it begins to simmer, then remove from heat and stir in the chopped chocolate and peppermint extract. Let the mixture rest for a couple of minutes to melt fully, then stir until smooth and glossy. Allow ganache to cool slightly before spreading over the chilled cheesecake.
Step 6: Assemble and Garnish
Pour the ganache over the chilled cheesecake, smoothing it evenly to cover every inch. Refrigerate for 30 more minutes to let the ganache set perfectly. Just before serving, top your gorgeous Creamy Mint Chocolate Cheesecake with a generous swirl of whipped cream, fresh mint leaves, and chocolate shavings for that inviting, irresistible finish.
How to Serve Creamy Mint Chocolate Cheesecake

Garnishes
While the ganache and mint leaves give the cheesecake a beautiful look, adding fluffy whipped cream and delicate chocolate shavings transforms it into a showstopper on your dessert table. These garnishes not only enhance presentation but also introduce different textures that make each bite even more exciting.
Side Dishes
If you’re serving this dessert at a dinner party, consider light accompaniments like fresh berries or a scoop of vanilla bean ice cream. The berries add a fruity contrast that brightens the palate, while the creamy ice cream pairs seamlessly with the cool mint and rich chocolate flavors.
Creative Ways to Present
Want to surprise your guests? Slice the cheesecake into petite squares, and serve atop decorative plates adorned with mint sprigs and drizzles of chocolate sauce. Alternatively, layer small portions in glass cups with crushed cookies and whipped cream for an elegant cheesecake parfait that’s just as delightful and visually stunning.
Make Ahead and Storage
Storing Leftovers
After enjoying your Creamy Mint Chocolate Cheesecake, cover any leftovers tightly with plastic wrap or store them in an airtight container in the refrigerator. It will stay fresh and flavor-packed for up to 5 days, making it perfect for savoring over a few cozy evenings.
Freezing
This cheesecake freezes wonderfully. For best results, freeze it uncut in an airtight container or wrapped well in plastic wrap and foil to prevent freezer burn. When you’re ready to indulge, thaw it overnight in the fridge, preserving that signature creamy texture.
Reheating
Cheesecake is best served chilled, so reheating is not recommended. Just let frozen cheesecake thaw fully in the refrigerator before serving to enjoy that perfect balance of creaminess and minty freshness, exactly as intended.
FAQs
Can I use a different type of cookie for the crust?
Absolutely! While chocolate sandwich cookies work beautifully, you can experiment with chocolate graham crackers or chocolate wafer cookies if you prefer. Just make sure to balance the sweetness so the crust complements rather than overpowers the filling.
Is peppermint extract necessary for the mint flavor?
Peppermint extract is key to achieving that bright, refreshing mint taste in this cheesecake. However, if you want a milder mint flavor, you could reduce the amount slightly or combine it with a few drops of natural mint oil.
Can I make this cheesecake vegan or dairy-free?
This recipe relies on cream cheese and heavy cream for its signature creaminess, so adapting it would require specialty vegan cream cheese and non-dairy cream alternatives. It’s possible but expect some changes in texture and flavor nuances.
Why bake the cheesecake in a water bath?
The water bath ensures gentle, even heat around the cheesecake, which prevents cracks and helps the filling bake smoothly. It also helps retain moisture, giving you that silky, creamy texture everyone loves.
How long does the ganache take to set?
Chilling the ganache topping for about 30 minutes is usually sufficient for it to firm up into a smooth, glossy finish. If you prefer a thicker layer, you can refrigerate it a bit longer before serving.
Final Thoughts
Trust me when I say that making this Creamy Mint Chocolate Cheesecake at home is one of those rare kitchen adventures that brings smiles, compliments, and perhaps a little bit of reverence from everyone at the table. It’s not just a dessert; it’s an experience of cozy charm wrapped in a decadent, minty embrace. So go ahead, gather your ingredients, and treat yourself to a slice (or two) of this melt-in-your-mouth magic!
Your email address will not be published. Required fields are marked *