

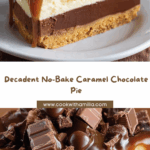
If you adore the irresistible blend of rich chocolate, dreamy caramel, and creamy layers nestled in a buttery crust, Creamy Caramel Chocolate Pie is your dessert soulmate. This luscious no-bake pie is a showstopper for potlucks, parties, or those well-deserved nights when you need a spoonful of pure happiness. Every decadent bite is packed with contrasting textures—from the crisp graham cracker crust to the silky cream cheese layer, finishing with gooey caramel, fudge, and a scattering of chocolate chunks. Whether you’re a devoted pie enthusiast or just in the mood for something indulgent, this Creamy Caramel Chocolate Pie never fails to make people swoon!
Ingredients You’ll Need

Ingredients You’ll Need
You’ll be amazed at how a handful of straightforward ingredients can layer together to create a dessert that’s both eye-catching and crave-worthy. Each element is carefully chosen for maximum flavor and the perfect creamy, dreamy texture that makes this pie unforgettable.
- Graham cracker crumbs: These form the base of the pie, adding a subtle sweetness and crunchy bite that anchors all the creamy layers above.
- Granulated sugar: Just enough extra sweetness to enhance the crust’s flavor and help it hold together.
- Melted unsalted butter: Binds the crust ingredients and contributes a rich, toasty flavor that pairs perfectly with chocolate and caramel.
- Instant chocolate pudding mix (3.9 oz package): Your shortcut to an ultra-smooth, fudgy chocolate layer—no fuss or stove time required.
- Cold milk: Brings the pudding mix to life while keeping the texture perfectly soft and set.
- Cream cheese (softened): Adds tangy richness to the creamy top layer, creating a beautiful contrast to the sweet chocolate and caramel.
- Powdered sugar: Sweetens the cream mixture while ensuring it stays pillowy and smooth.
- Vanilla extract: Rounds out the flavors with warm, aromatic notes that amplify both chocolate and caramel.
- Frozen whipped topping (thawed): Folds gently into the cream cheese, giving the top layer its airy, mousse-like finish.
- Caramel sauce: The perfect finish—its golden, glossy ribbons add true caramel decadence in every slice.
- Chocolate fudge sauce: Delivers a rich, silky chocolate edge that makes the pie feel extra-special and over-the-top.
- Chocolate chunks or chopped chocolate bars: Adds crunch, texture, and a dramatic garnish that signals you’re about to bite into something amazing!
How to Make Creamy Caramel Chocolate Pie
Step 1: Prepare the Buttery Graham Cracker Crust
Start by combining your graham cracker crumbs, granulated sugar, and warm, melted butter in a bowl. Get in there with a fork or your hands and mix until the texture resembles wet sand. This mixture presses beautifully into a standard 9-inch pie dish. Be sure to go up the sides and pack it firmly—this crust is the pie’s foundation! Chill the crust in the refrigerator for about 10–15 minutes while you start on the filling, so it sets nicely.
Step 2: Whisk Up the Chocolate Layer
Grab your instant chocolate pudding mix and whisk it together with cold milk until it thickens. You’ll see it transform into a glossy, chocolatey pudding right before your eyes. Spread this rich layer evenly over the chilled graham cracker crust. It begins to set almost immediately, giving you a perfect base for the creamy layer to come.
Step 3: Mix the Creamy Layer
Using a stand or handheld mixer, beat softened cream cheese with powdered sugar and vanilla until the mixture is super smooth and fluffy—no lumps allowed here! Fold in the thawed whipped topping gently using a spatula, preserving as much airiness as possible. This cloud-like, slightly tangy layer is the secret weapon that makes Creamy Caramel Chocolate Pie so unforgettable. Spread it carefully over the set chocolate layer for maximum drama in every slice.
Step 4: Add the Signature Toppings
Now for the grand finale: drizzle the top of your pie with caramel sauce and chocolate fudge sauce, letting them mingle in swoops and ribbons. Finish with a generous shower of chocolate chunks or shavings on top—this not only makes the Creamy Caramel Chocolate Pie look bakery-worthy, but adds a delicious bite that everyone will fight over!
Step 5: Chill to Set
This pie reaches perfection after a long, luxurious chill. Place it in the refrigerator for at least 4 hours (overnight is even better), letting all the flavors meld and the layers set into luscious, sliceable magic. When it’s time to serve, you’ll be rewarded with clean layers and rich, decadent flavor in every bite.
How to Serve Creamy Caramel Chocolate Pie
Garnishes
Dress your Creamy Caramel Chocolate Pie with an extra flourish to make it truly guest-ready. I love an extra swirl of whipped topping, fresh chocolate curls, or a dusting of cocoa powder. For a salty-sweet burst, a sprinkle of flaky sea salt over the caramel transforms every bite.
Side Dishes
Because this pie is so rich and creamy, go light with your accompaniments: serve with fresh berries for brightness, or a hot cup of coffee or espresso to cut through the sweetness. A scoop of vanilla or coffee ice cream on the side takes dessert to a whole new comfort zone.
Creative Ways to Present
Get playful and portion your pie into mini mason jars for parties, or serve decadent slices in vintage teacups for a charming twist. You can even chill it in a rectangular pan, slice into bars, and serve for easy-to-eat treats at larger gatherings.
Make Ahead and Storage
Storing Leftovers
Leftovers of Creamy Caramel Chocolate Pie (if you have any!) keep beautifully. Cover the pie tightly with plastic wrap or store individual slices in airtight containers in the refrigerator for up to 4 days. The crust stays surprisingly crisp, and the layers remain soft and delightful.
Freezing
Want to make Creamy Caramel Chocolate Pie ahead for another day? Simply wrap it well (whole or sliced) in several layers of plastic wrap and then aluminum foil, and freeze for up to a month. Thaw overnight in the refrigerator—the texture holds up especially well, though you may wish to hold off on adding the final garnishes until just before serving for the best presentation.
Reheating
This cool, creamy dessert is meant to be enjoyed chilled, not warmed up. If it’s been frozen, just allow ample time in the fridge to thaw gently. Popping it in the microwave is not recommended, as it will spoil those beautiful layers and smooth textures.
FAQs
Can I use a store-bought graham cracker crust instead of making my own?
Absolutely! If you’re short on time, a pre-made graham cracker crust is a wonderful shortcut and will still deliver that buttery crunch. Just ensure it’s a 9-inch crust for the best fit.
Is it possible to use homemade caramel and fudge sauces?
Yes, homemade sauces will elevate your Creamy Caramel Chocolate Pie to gourmet territory! Feel free to use store-bought for convenience, but if you have a favorite homemade caramel or fudge sauce recipe, it adds a personal touch.
Can I substitute the whipped topping with freshly whipped cream?
Definitely! Use the same amount of freshly whipped cream (about 3 cups, whipped to medium peaks). Just be aware the pie may be slightly softer, so chill thoroughly for clean slices.
How do I avoid lumps in the cream cheese layer?
Your secret weapon here is softened cream cheese. Let it come to room temperature before beating, and sift your powdered sugar to ensure a smooth, lump-free filling that makes the Creamy Caramel Chocolate Pie extra creamy.
Can I make Creamy Caramel Chocolate Pie gluten-free?
Yes—just opt for gluten-free graham crackers or a gluten-free cookie base for the crust. Double-check all other packaged ingredients (like pudding mix) to ensure they’re gluten-free, and you’re good to go!
Final Thoughts
There’s just something magical about a chilled slice of Creamy Caramel Chocolate Pie waiting in your fridge. Whether you’re celebrating, hosting friends, or satisfying a serious sweet tooth, this pie is pure joy from start to finish. You deserve to taste how easy and spectacular homemade dessert can be—don’t wait to try it for yourself!
Your email address will not be published. Required fields are marked *