

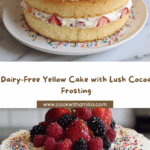
If you’ve been dreaming of a moist, golden-tender cake topped with rich chocolate frosting, but need something dairy-free, you’re going to absolutely love this Classic Dairy-Free Yellow Cake with Cocoa Frosting. It’s the kind of cake that makes everyone feel welcome at the table—so soft, cheerful, and nostalgic that you might just forget it’s made without butter or milk. Whether it’s a birthday blowout or just a “let’s celebrate Tuesday” kind of treat, this cake has universal appeal and brings the party every time. Get ready to wow your guests with a bakery-worthy showstopper that just happens to suit your dietary needs. Let’s dig in!

Ingredients You’ll Need
It’s amazing how the most humble pantry ingredients can join forces to create something so crave-worthy. Each element in this Classic Dairy-Free Yellow Cake with Cocoa Frosting brings its own magic, lending softness, structure, and deep chocolate allure. Here’s what you’ll need and why it matters:
- All-purpose flour (or gluten-free 1:1 blend): The backbone of your cake, providing structure and a tender crumb, with gluten-free options for everyone at the table.
- Baking powder: Delivers lightness and fluffiness, making your layers beautifully rise.
- Baking soda: Works alongside the acid to help the cake rise and achieve that signature yellow cake texture.
- Salt: Just a pinch sharpens flavors and balances sweetness for a more nuanced treat.
- Dairy-free milk (soy, oat, or almond): Moistens the batter and helps create an ultra-soft texture—choose your favorite variety for a personalized flavor.
- Apple cider vinegar (or lemon juice): Curdles the milk to mimic buttermilk and deepens the cake’s tangy, rich flavor.
- Granulated sugar: Sweetens every bite and contributes to a tender crumb and caramelized color.
- Coconut oil or vegetable oil: Brings richness and keeps the cake moist (without any dairy at all!).
- Unsweetened applesauce: A sneaky secret for extra moisture and subtle sweetness—you’ll never taste the apples, promise!
- Vanilla: Rounds out the flavors, making every bite feel like the classic birthday cake you remember.
- Dairy-free butter substitute: The creamy base your dreamy chocolate frosting needs, ensuring every swoop is just as luscious as the original.
- Unsweetened cocoa powder: Brings that rich, deep chocolate flavor to the frosting, making it irresistible.
- Powdered sugar: Sweetens and thickens your frosting to the perfect spreading consistency.
- More dairy-free milk: Adjusts the frosting’s texture—add it little by little until perfectly creamy.
- Vanilla: A hint in the frosting enhances both the chocolate and the cake itself.
- Optional garnish: Chocolate shavings or sprinkles: For that finishing touch that makes every slice look extra celebratory.
How to Make Classic Dairy-Free Yellow Cake with Cocoa Frosting
Step 1: Prep Your Cake Pans and Oven
Start by heating your oven to 350°F (175°C). This early oven preheat is key—your batter is happiest going into a hot oven to get its best rise. Take a moment to line your cake pans with parchment paper and give them a quick spray or greasing, to guarantee the finished cakes pop out with ease and have tidy edges that’ll frost perfectly later on.
Step 2: Whisk Together the Dry Ingredients
In a medium bowl, whisk the flour, baking powder, baking soda, and salt together until they’re well blended. This simple step is the secret to an evenly textured, softly domed Classic Dairy-Free Yellow Cake with Cocoa Frosting—no lumpy bits or uneven rises here!
Step 3: Create a Dairy-Free “Buttermilk”
Measure out your dairy-free milk and add the apple cider vinegar or lemon juice. Let it sit for 3 to 5 minutes while the acids do their thing—curdling the milk slightly and creating that beautiful tang you associate with classic yellow cakes. This trick makes your dairy-free cake taste delightfully “traditional.”
Step 4: Blend the Wet Ingredients
In a large bowl, whisk together the granulated sugar, coconut oil or vegetable oil, applesauce, and vanilla. Pour in your homemade dairy-free buttermilk and whisk until everything’s combined. The resulting mixture should be creamy, pale, and oh-so-inviting.
Step 5: Combine Wet and Dry, Then Whisk Smooth
Add the dry mixture into the wet a little at a time, folding gently so as not to overwork the batter. Once fully combined, give it a mix until smooth—don’t overbeat, but do make sure there are no floury pockets. The batter should look sunny, slightly thick, and silky.
Step 6: Bake to Golden Perfection
Divide your batter evenly between the prepared pans and smooth the tops. Place in the oven and bake for 25 to 30 minutes, or until the cakes are firm, lightly golden, and a toothpick poked into the center comes out clean. Let the pans cool for a few minutes before turning your cakes out onto a rack to cool completely—patience pays off here for the best Classic Dairy-Free Yellow Cake with Cocoa Frosting.
Step 7: Whip Up Dreamy Cocoa Frosting
Beat together the dairy-free butter, unsweetened cocoa powder, powdered sugar, milk, and vanilla. Start slow to avoid a powdered sugar blizzard, then whip until the frosting is irresistibly creamy and easy to spread. Adjust with extra milk if needed—a tablespoon at a time does the trick.
Step 8: Frost and Decorate
Once your cakes are fully cool, place one layer on your serving plate. Slather a thick layer of cocoa frosting over the top, then gently stack the second cake layer. Coat the top and sides with the rest of your frosting using swoops and swirls for that bakery finish. Add chocolate shavings or colorful sprinkles for that final “wow” effect, and there you have it—a true Classic Dairy-Free Yellow Cake with Cocoa Frosting!
How to Serve Classic Dairy-Free Yellow Cake with Cocoa Frosting

Garnishes
The simplest finishing touches often make the biggest impact. Shower the top of your cake with delicate chocolate shavings or go bold with rainbow sprinkles for a festive feel. Even a dusting of powdered sugar can make each slice of Classic Dairy-Free Yellow Cake with Cocoa Frosting look like it came from a fancy bakery.
Side Dishes
If you want to round things out, serve this cake alongside fresh berries, a scoop of fruit sorbet, or even a dollop of dairy-free whipped cream. The bright, juicy fruits and creamy textures make a perfect pairing, balancing the rich cocoa frosting for a truly memorable dessert experience.
Creative Ways to Present
For birthdays or special occasions, try slicing the cake into individual squares or layers and serving them on colorful plates. You can even assemble mini layer cakes with cookie cutters for darling single-serves. No matter how you slice it, Classic Dairy-Free Yellow Cake with Cocoa Frosting always steals the show!
Make Ahead and Storage
Storing Leftovers
If you happen to have any leftovers (it’s unlikely, but you never know!), keep slices in an airtight container at room temperature for up to two days, or in the fridge for up to five days. The cake stays surprisingly moist, while the cocoa frosting maintains its smooth, fudgy appeal.
Freezing
This cake is a dream for planners! To freeze, wrap individual slices or entire layers tightly in plastic wrap, then place them in freezer-safe bags. They’ll keep for two months—just thaw overnight in the fridge whenever you need a quick sweet fix or an impromptu celebration.
Reheating
If you like a slightly warm cake (who doesn’t?), pop a slice in the microwave for 10 to 15 seconds after thawing or chilling. It brings back all that fresh-baked aroma and gives the frosting a melt-in-your-mouth texture, making your Classic Dairy-Free Yellow Cake with Cocoa Frosting taste as if it’s right from the oven again.
FAQs
Can I make this cake gluten-free?
Absolutely! Just swap in a measure-for-measure gluten-free flour blend. The cake will still deliver on that classic flavor and texture, so everyone, gluten-free or not, can enjoy a slice of Classic Dairy-Free Yellow Cake with Cocoa Frosting.
Is there a substitute for applesauce in the recipe?
If you’re out of applesauce, mashed ripe banana or dairy-free yogurt works wonderfully as a stand-in, adding the same moisture and a gentle sweetness to your cake layers.
Will the cake taste like coconut oil?
Not at all! The subtle flavor of coconut oil fades completely as the cake bakes, leaving behind only moisture and tenderness. If you’re sensitive to coconut, use a neutral oil instead for your Classic Dairy-Free Yellow Cake with Cocoa Frosting.
Can I make this recipe as cupcakes?
Definitely! Simply divide the batter among cupcake liners and reduce the baking time to about 18-22 minutes. Keep an eye out for golden domes and springy tops—then frost as you normally would for adorable mini Classic Dairy-Free Yellow Cake with Cocoa Frosting treats.
What’s the best way to get smooth, bakery-like frosting?
Use room temperature dairy-free butter substitute and sift your powdered sugar and cocoa powder before mixing. Take your time whipping the frosting—you’ll end up with a silky, swoonworthy finish every time.
Final Thoughts
Cake is about more than just dessert—it’s about memories, celebration, and sharing something special. With this Classic Dairy-Free Yellow Cake with Cocoa Frosting, you get all the golden nostalgia and irresistible chocolate flavor in every bite, minus the dairy. I can’t wait for you to try it, and share your own moments of joy and deliciousness with the people you love most.
Your email address will not be published. Required fields are marked *