

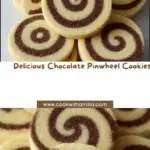
If you’re searching for a cookie that’s as delightful to look at as it is to eat, let me introduce you to Chocolate Pinwheel Cookies. These classic treats are famous for their playful spirals of vanilla and chocolate dough, offering a gorgeous contrast in both color and flavor. They’re buttery, tender, and melt-in-your-mouth dreamy—a perfect companion to an afternoon coffee or as a show-stopping addition to your holiday cookie platter. Trust me, once you try baking Chocolate Pinwheel Cookies, you’ll want to make them for every occasion!

Ingredients You’ll Need
The beauty of Chocolate Pinwheel Cookies lies in their simplicity—each ingredient serves an important role in shaping the taste and achieving those stunning spirals. Gather these pantry staples and let each one shine!
- All-purpose flour: Provides the essential structure for both the vanilla and chocolate doughs, resulting in cookies that hold their definition but are still tender.
- Granulated sugar: Adds just the right amount of sweetness and helps the cookies achieve a delicate, crisp-edged bite.
- Unsalted butter, softened: The foundation of a rich, melt-in-your-mouth texture—be sure it’s at room temperature for easy creaming.
- Vanilla extract: Infuses the doughs with warmth and depth, elevating the flavors above ordinary sugar cookies.
- Pinch of salt: A tiny pinch goes a long way in balancing flavors and highlighting both the chocolate and vanilla notes.
- Unsweetened cocoa powder: Brings a deep, aromatic chocolate layer—use a high-quality kind for an extra decadent pinwheel effect.
How to Make Chocolate Pinwheel Cookies
Step 1: Prepare the Vanilla and Chocolate Doughs
Start by making the vanilla and chocolate doughs in two separate bowls. Cream butter and sugar together until light and fluffy for each, then blend in the vanilla extract and salt. Gradually add the flour to each bowl; for the chocolate half, sift in unsweetened cocoa powder with the flour. You’re looking for soft, smooth doughs that come together easily without being sticky.
Step 2: Chill the Dough
Shape both the vanilla and chocolate doughs into flat rectangles, wrap tightly in plastic, and chill in the refrigerator for 30 to 45 minutes. This step is key for rolling out the dough smoothly later on and makes the cookies easier to slice.
Step 3: Roll Out and Layer the Dough
Once chilled, roll out each dough separately on parchment paper into equal-sized rectangles about ¼ inch thick. Carefully place one sheet on top of the other (whichever order you prefer—vanilla or chocolate on the outside!) and gently press them together to eliminate any air pockets.
Step 4: Create the Pinwheel Swirl
With the doughs layered, start at the long edge and gently roll the whole thing into a log, using the parchment paper to help guide and tighten the roll as you go. Wrap the log tightly in cling film and chill for at least 2 hours (or give it a quick 30-minute stint in the freezer if you’re in a hurry). The chilling ensures picture-perfect swirls when slicing.
Step 5: Slice and Bake
Preheat your oven to 350°F (180°C) and line a baking tray with parchment paper. Unwrap your chilled log and slice it into ¼ inch thick rounds. Arrange them on the tray, giving the cookies a bit of space to expand. Bake for 10 to 12 minutes, just until the edges begin to turn golden. Let them cool on the tray for a few minutes before transferring to a rack—then try not to eat them all at once!
How to Serve Chocolate Pinwheel Cookies

Garnishes
If you’re in the mood for a little extra flourish, dust your Chocolate Pinwheel Cookies with a light shower of powdered sugar or a drizzle of melted chocolate. Sprinkles or a dip in chocolate on the edge make them a festive treat for special occasions.
Side Dishes
These cookies are a dream next to a cup of coffee, hot cocoa, or even a scoop of vanilla ice cream. For an elegant tea party, serve Chocolate Pinwheel Cookies on a platter with fresh berries, fruit preserves, or a selection of cheeses.
Creative Ways to Present
Try packaging your Chocolate Pinwheel Cookies in a clear box with a pretty ribbon for a homemade gift that looks as good as it tastes. You can also alternate them with other cookies on a tray to create an eye-catching dessert spread—with those swirls, they’re always the star.
Make Ahead and Storage
Storing Leftovers
Keep any leftover cookies in an airtight container at room temperature. They’ll stay buttery and fresh for up to a week, perfect for nibbling whenever you need a little pick-me-up.
Freezing
Pinwheel cookie dough freezes beautifully! Once you’ve rolled the dough into a log, wrap it tightly and freeze for up to 2 months. When you’re ready to bake, just thaw the log slightly before slicing and baking as usual. You can also freeze baked cookies—just place them in a single layer and thaw at room temperature.
Reheating
If you love a warm cookie, pop a few cookies in a 300°F oven for about 3 minutes to refresh their just-baked aroma and texture. They’ll be soft and fragrant, as if they just came out of the oven.
FAQs
Can I make Chocolate Pinwheel Cookies with salted butter?
Yes! If you have salted butter on hand, just skip the pinch of salt in the recipe. It works in a pinch and won’t compromise the flavor.
Why did my pinwheel swirl spread out in the oven?
This can happen if the dough warms up too much before baking. Make sure the log is well chilled and use a sharp knife to slice for neat spirals every time.
Can I add nuts or other flavors to the dough?
Absolutely! Finely chopped nuts, orange zest, or even a hint of espresso powder can add a fun twist to your Chocolate Pinwheel Cookies.
How do I keep the spirals from sticking when rolling?
Rolling each dough between parchment paper and being sure to chill them well before stacking makes the process much easier. Lightly dust with flour if they get too sticky.
Can these be made gluten-free?
Yes, swap in your favorite cup-for-cup gluten-free flour blend for all-purpose flour. The texture will be a bit different, but the cookies will still look and taste fantastic!
Final Thoughts
I can’t wait for you to give these Chocolate Pinwheel Cookies a try. Whether you’re baking for a celebration or just treating yourself, their gorgeous spirals and classic flavors always bring a little extra joy to the day. Roll up your sleeves and have some fun in the kitchen—you’ll love sharing (and eating!) every batch.
Your email address will not be published. Required fields are marked *