

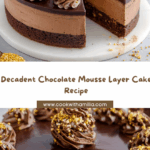
If you have a sweet tooth that craves something truly special, then you are in for a treat with this Chocolate Mousse Layer Cake – Silky & Luxurious. Imagine layers of moist, rich chocolate cake folded between fluffy, melt-in-your-mouth chocolate mousse, all coming together to create a dessert so decadent yet airy, you’ll want to savor every bite. This cake is a celebration of textures and flavors, perfectly balanced to deliver a dessert experience that feels both elegant and comforting.

Ingredients You’ll Need
Gathering simple yet high-quality ingredients is the secret to whipping up this cake. Each one plays a vital role—from the rich cocoa that gives the cake its deep chocolate flavor to the heavy cream that creates the luscious mousse filling and frosting. Every component comes together to build that perfect silky and luxurious texture.
- All-purpose flour: Provides the sturdy base to the cake layers without weighing them down.
- Granulated sugar: Sweetens the cake while helping to keep it moist.
- Unsweetened cocoa powder: Brings that intense chocolatey richness for a bold flavor.
- Baking soda: Leavens the cake for a light, tender crumb.
- Salt: Enhances and balances the chocolate’s depth.
- Eggs: Bind the ingredients together and add structure to the cake.
- Buttermilk: Adds tang and moisture, making the cake soft and fluffy.
- Vegetable oil: Keeps the cake wonderfully moist without overpowering the flavor.
- Vanilla extract: Lifts and rounds out the chocolate with warmth.
- Hot coffee or hot water: Enhances the chocolate’s richness for a deeper, more complex taste.
- Semi-sweet or dark chocolate: Forms the decadent base of the chocolate mousse filling and frosting.
- Heavy cream: Whipped to perfection for that airy, silky mousse texture.
- Light corn syrup (optional): Adds a glossy sheen to the mousse for a gorgeous finish.
- Powdered sugar: Sweetens the mousse without grit.
- Optional garnishes: Chocolate shavings, curls, or fresh berries to make the cake as beautiful as it tastes.
How to Make Chocolate Mousse Layer Cake – Silky & Luxurious
Step 1: Prepare the Cake Layers
Start by heating your oven to 350°F (175°C) and greasing three 8-inch round cake pans thoroughly or lining them with parchment paper. Combining all your dry ingredients—flour, sugar, cocoa, baking soda, and salt—in a large bowl ensures even distribution for a consistently delicious cake. Then, you’ll whisk in eggs, buttermilk, oil, and vanilla to create a velvety batter. Adding hot coffee or water might make the batter look thin, but trust that this step is what imparts a deeper chocolate flavor. Pour the batter evenly into your pans and bake for about 25 to 30 minutes. You’ll know they’re done when a toothpick comes out clean. Let the layers cool slightly before transferring them to wire racks to cool completely—this is crucial for assembling the cake later on.
Step 2: Make the Silky Chocolate Mousse
While the cakes cool, it’s time to prepare the delectable chocolate mousse that truly defines this dessert. Place chopped chocolate in a heatproof bowl and gently heat half a cup of heavy cream until steaming, then pour it right over the chocolate. Let it rest for a couple of minutes to gently melt the chocolate before stirring until perfectly smooth. Mixing in light corn syrup here helps give that luscious shine, though it’s optional. Once the mixture cools to room temperature, whip the remaining cold heavy cream with powdered sugar and vanilla to soft peaks, then carefully fold it into your cooled chocolate blend. The result should be fluffy, airy, and so silky that it practically melts on your tongue.
Step 3: Assemble the Cake
Time to bring it all together! Place one cake layer on your serving plate and generously spread about ¾ cup of mousse over it. Repeat with the second layer, then place the final cake layer on top. Use the remaining mousse to frost the entire cake, spreading smoothly with an offset spatula or swirling it for a more whimsical look. This frosting doubles as filling and the final coat, keeping every bite rich and cohesive. Pop the cake in the refrigerator for at least two hours so the mousse can set up for the perfect texture.
How to Serve Chocolate Mousse Layer Cake – Silky & Luxurious

Garnishes
A cake this elegant deserves equally stunning garnishes. Chocolate shavings or curls add texture and a beautiful rustic appeal, while fresh berries provide a pop of color and tartness that contrast perfectly with the cake’s sweetness. Feel free to sprinkle a dusting of cocoa powder or even a light sprinkle of edible gold dust for an extra-special touch.
Side Dishes
This luxurious cake shines all on its own but pairing it with a lightly brewed coffee or vibrant red wine can elevate the experience. For a lighter complement, serve alongside fresh whipped cream or a scoop of vanilla bean ice cream to balance the intense chocolate flavor with creamy softness and a hint of coolness.
Creative Ways to Present
Presentation can turn your Chocolate Mousse Layer Cake – Silky & Luxurious into the centerpiece of any occasion. Try layering the cake in a clear glass trifle bowl for a stunning visual of the layers, or create individual mini versions in pretty ramekins for an intimate dessert experience. You could even dust the cake with powdered sugar or drizzle a bit of chocolate ganache for an ultra-glam finish.
Make Ahead and Storage
Storing Leftovers
Leftover Chocolate Mousse Layer Cake – Silky & Luxurious can be stored in the refrigerator, tightly covered with plastic wrap or in an airtight container. This helps maintain the mousse’s delicate texture and prevents the cake from drying out. Try to consume leftovers within 3 to 4 days for the best freshness.
Freezing
If you want to keep this cake longer, freezing is a great option. Wrap the cake thoroughly in plastic wrap, then in aluminum foil, and freeze for up to 2 months. When ready to enjoy, thaw it overnight in the refrigerator to preserve the silky mousse texture without melting it too much.
Reheating
Unlike some cakes, this Chocolate Mousse Layer Cake – Silky & Luxurious is best served chilled and isn’t meant to be warmed. Reheating could ruin the airy mousse, so stick to serving it fresh or slightly chilled for the best flavor and texture experience.
FAQs
Can I use milk chocolate instead of dark or semi-sweet chocolate?
Absolutely! Using milk chocolate will create a sweeter and creamier mousse, but just keep in mind the flavor won’t be as intense or bittersweet as with dark or semi-sweet chocolate. It’s a delicious variation if you prefer a milder chocolate taste.
Do I have to use buttermilk in the cake?
Buttermilk adds tenderness and a subtle tang that helps balance the sweetness, but if you don’t have it on hand, you can substitute with regular milk mixed with a tablespoon of lemon juice or white vinegar to mimic its acidity.
Can I make this cake gluten-free?
Yes! You can replace the all-purpose flour with a gluten-free flour blend that measures cup-for-cup like regular flour. Make sure your blend contains xanthan gum or add it separately to help hold the structure of the cake.
Is it possible to make the mousse dairy-free?
To make the mousse dairy-free, use a dairy-free chocolate that melts well, such as dark chocolate without milk, and substitute the heavy cream with coconut cream. Whip the coconut cream chilled until fluffy and proceed as you would with regular cream.
How long does the cake keep in the refrigerator before it loses quality?
This cake is best enjoyed within 3 to 4 days when kept refrigerated. The mousse filling might start to lose its silky texture after this point, so try to savor it fresh for the best taste and feel.
Final Thoughts
This Chocolate Mousse Layer Cake – Silky & Luxurious is more than just a dessert; it’s an experience to share with friends and family. From the first forkful, you’ll notice how each layer invites you into a world of rich chocolate bliss balanced with airy mousse that feels decadently light. Whether it’s a special occasion or a moment when you just want to treat yourself, this cake will not disappoint. Give it a go, and prepare to fall head over heels for this silky, luscious creation!
Your email address will not be published. Required fields are marked *