

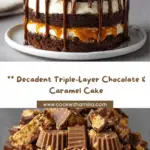
If your dream dessert is one that combines rich chocolate, gooey caramel, and the irresistible crunch of candy, then you’ll fall head over heels for this Cake with Caramel and Peanut Butter Cups. Imagine three melt-in-your-mouth chocolate layers, each generously swirled with homemade caramel, sandwiched and topped with a velvety chocolate buttercream and showered with peanut butter cup pieces. This is pure celebration—whether for a birthday, a holiday, or just a Tuesday night chocolate craving. Get ready for a crowd-pleaser that’s every bit as joyful to make as it is to eat!
Ingredients You’ll Need

Ingredients You’ll Need
Gather these easy-to-find but essential ingredients for Cake with Caramel and Peanut Butter Cups—the magic is in how each one plays its part. Don’t skip any, as every component brings flavor, moisture, and that wow-worthy finish we all crave!
- All-purpose flour: The backbone for those sturdy, sliceable cake layers—use the spoon-and-level method for accuracy.
- Granulated sugar: Sweetens both cake and caramel while locking in moisture for a tender crumb.
- Unsweetened cocoa powder: Use a good-quality variety for deep, true chocolate flavor.
- Baking powder & baking soda: This duo creates lift, ensuring the cake rises light and fluffy with a balanced rise every time.
- Salt: A pinch wakes up all the flavors—skip it, and your cake could taste flat.
- Buttermilk: Adds tang and tenderness, yielding super-moist, melt-in-your-mouth layers.
- Hot water or coffee: Coffee intensifies the chocolate, but hot water does the trick if you prefer a milder profile.
- Vegetable oil: Ensures your cake stays soft even after a day or two—no dry layers here!
- Eggs: Help bind the batter and give structure without weighing it down.
- Vanilla extract: Rounds out the chocolate and caramel, lending aromatic warmth to every bite.
- Unsalted butter: Needed for both caramel and frosting, it gives a luscious, creamy base that lets those flavors shine.
- Heavy cream: Essential for making the caramel ultra-silky and for a luscious, spreadable frosting.
- Powdered sugar: Makes the frosting fluffy and smooth—no graininess allowed.
- Chopped peanut butter cups: These little nuggets bring salty-sweet peanut butter flavor and a fun, candy-bar crunch throughout the cake.
- Caramel drizzle: For a glossy, seductive finish that wows your guests right before serving.
How to Make Cake with Caramel and Peanut Butter Cups
Step 1: Prepare the Cake Pans and Oven
Preheat your oven to 350°F (175°C), and take a minute to grease and line three 9-inch round cake pans with parchment paper. This extra step ensures that your layers will release effortlessly—nobody wants all the goodness to stick just as the excitement builds!
Step 2: Make the Chocolate Cake Batter
Sift together the flour, granulated sugar, cocoa powder, baking powder, baking soda, and salt in a large mixing bowl. This keeps your texture perfectly even and lump-free. Next, add in the buttermilk, vegetable oil, eggs, and vanilla extract. Mix until you have a smooth, velvety batter. Gradually pour in the hot water (or coffee) as you stir—the batter will look thin, but trust me, that’s the secret behind ultra-moist layers that practically melt on your tongue.
Step 3: Bake the Cake Layers
Divide the batter evenly among your three prepared pans, gently smoothing the tops with a spatula. Pop them into the oven and bake for 28 to 32 minutes. The irresistible aroma is your first reward, but patience! Test with a toothpick in the center; it should come out clean or with a few moist crumbs. Let the cakes cool in their pans for 10 minutes, then carefully turn them onto wire racks to cool completely.
Step 4: Prepare the Caramel Sauce
Now for the caramel: sprinkle granulated sugar into a dry, heavy-bottomed saucepan over medium heat. Watch carefully as it melts, swirling the pan gently (don’t stir just yet) until the sugar turns a gorgeous, deep amber color. Whisk in the butter until fully melted, then slowly stream in the warm heavy cream. The mixture will bubble up—just keep whisking till smooth. Let it cool before using, as the thicker caramel clings perfectly between cake layers.
Step 5: Make the Chocolate Frosting
In a large bowl, beat the softened butter until ultra-fluffy. Sift in the powdered sugar and cocoa powder to avoid any lumps, pouring in the heavy cream and vanilla as you mix. Beat everything together until you have a creamy, spoon-licking frosting that spreads easily over every nook and cranny of your cake.
Step 6: Assemble the Cake with Caramel and Peanut Butter Cups
Place your first cooled chocolate cake layer on a platter or cake stand. Smother on a layer of chocolate frosting, then spoon and gently swirl on a drizzle of caramel sauce. Sprinkle a generous handful of chopped peanut butter cups for a peek of what’s to come. Repeat with the second layer, then top with the final cake round. Frost the whole outside, drip more caramel over the top edge so it cascades down the sides, and finish with even more peanut butter cups. It’s a joyful art project you’ll want to show off!
How to Serve Cake with Caramel and Peanut Butter Cups
Garnishes
For the ultimate finish, sprinkle extra chopped peanut butter cups over the top and let ribbons of caramel drip along the cake’s edges. You can even add a pinch of flaky sea salt on top—the salty touch turns every slice into a flavor bomb! A swirl of whipped cream on the side or a dusting of cocoa powder transforms your Cake with Caramel and Peanut Butter Cups into something truly bakery-worthy.
Side Dishes
While this cake can certainly shine solo, serve it alongside scoops of classic vanilla or peanut butter ice cream, or a bright pyramid of fresh berries to contrast the richness. A cup of strong coffee or a cold glass of milk will make every bite even more luscious.
Creative Ways to Present
For a show-stopping display, assemble the Cake with Caramel and Peanut Butter Cups on a pretty cake stand and surround it with mini peanut butter cups. For parties, slice the cake into slim wedges and offer in cupcake liners for easy, grab-and-go portions. Or, get playful by serving individual slices with a drizzle of warm caramel right before guests dive in!
Make Ahead and Storage
Storing Leftovers
Store leftover Cake with Caramel and Peanut Butter Cups tightly wrapped or in an airtight container at room temperature for up to 2 days, or refrigerate for up to 5 days. The caramel and frosting will keep everything deliciously moist, but be sure to bring slices to room temperature for the best flavor and texture.
Freezing
You can freeze this cake with amazing results! Wrap slices, or the whole (unfrosted or fully decorated) Cake with Caramel and Peanut Butter Cups well in plastic wrap and aluminum foil. Freeze up to 2 months. Thaw overnight in the refrigerator, then let it sit at room temp until soft before serving.
Reheating
If you prefer your cake a little warm (especially to make that caramel gooey again!), microwave an individual slice for just 10 to 15 seconds. Too much longer and the frosting may melt, so keep a close watch. It’s decadent and cozy—an instant pick-me-up!
FAQs
Can I make the caramel sauce ahead of time?
Absolutely! The homemade caramel can be prepared up to a week in advance. Just keep it in an airtight container in the fridge, and gently warm before drizzling over the cake.
What if I only have two cake pans?
No worries! You can bake the batter in batches, using two pans at a time. Allow the first layers to cool, then clean and reuse the pans for the final layer. The end result is just as impressive!
Is it okay to use store-bought caramel sauce?
If you’re short on time, a quality store-bought caramel works perfectly well. While nothing beats homemade, the Cake with Caramel and Peanut Butter Cups will still be utterly irresistible.
How can I ensure my cake layers are even?
Use a kitchen scale to divide your batter equally, and smooth the surface before baking. Level the tops with a serrated knife, if needed, before stacking to get a bakery-style finished look.
Can this recipe be made gluten-free?
Yes! Substitute your favorite 1-to-1 gluten-free flour blend for the all-purpose flour. Just be sure the rest of your ingredients, including peanut butter cups, are certified gluten-free.
Final Thoughts
Trust me when I say, making this Cake with Caramel and Peanut Butter Cups is worth every moment in the kitchen—each bite is a glorious harmony of chocolate, caramel, and peanut butter candy. It’s the kind of dessert that creates memories and draws everyone back for seconds, so treat yourself and your loved ones to this ultimate delight!
Your email address will not be published. Required fields are marked *