

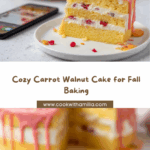
If you’re searching for a dessert that’s as memorable as it is delicious, Burn-Away Cake is here to sweep you off your feet. This homey, spice-laced cake bakes up into a crumb that’s soft and comforting, thanks to a medley of wholesome ingredients like carrots, walnuts, and a touch of buttermilk. The result is a treat that feels equally at home at a family potluck or a quiet afternoon with coffee—every slice packs coziness and just the right hint of nostalgia. I can’t wait to share my favorite Burn-Away Cake with you!

Ingredients You’ll Need
The magic of Burn-Away Cake is that every ingredient knows its place—nothing fancy, but each one brings a delicious dimension in taste, texture, or color. Let’s take a peek at what you’ll need (and why you’ll love each bite).
- All-purpose flour: The sturdy yet tender base that gives your cake its lovely crumb.
- Baking soda: This little bit of leavening lifts the batter for a soft and fluffy texture.
- Cinnamon: Adds a gentle warmth and sweet spice that wraps each bite in comfort.
- Salt: Just a pinch brings all the flavors together and balances the sweetness.
- Granulated sugar: Sweetens every bite and helps to keep the Burn-Away Cake moist.
- Vegetable oil: For a cake that’s extra tender and stays fresh longer—much easier than butter!
- Large eggs: Essential for binding the ingredients and adding richness.
- Vanilla extract: Rounds out the flavor profile with its fragrant aroma.
- Grated carrots: Not just for color—these make the cake moist, sweet, and deeply satisfying.
- Chopped walnuts: A crunchy surprise in every bite, these add earthy flavor and lovely texture.
- Buttermilk: The secret to a tender, tangy crumb you’ll fall in love with.
How to Make Burn-Away Cake
Step 1: Prep the Pan and Heat the Oven
Start by preheating your oven to 350°F—this ensures the Burn-Away Cake starts off at the perfect temperature for an even rise. Generously grease a 9×9 inch pan so the cake releases easily and retains its gorgeous shape after baking.
Step 2: Mix the Dry Ingredients
In a medium bowl, whisk together the flour, baking soda, cinnamon, and salt. This step makes sure the cake’s backbone is evenly blended and ready to carry all that lovely moisture and flavor.
Step 3: Combine Sugar and Oil
In another bowl, beat the sugar and oil together until smooth and glossy. This mixture gives you that signature soft crumb and keeps the cake fresh for days—the hallmark of a swoon-worthy Burn-Away Cake.
Step 4: Add Eggs
Now, beat in the eggs one at a time, mixing well after each addition. You’ll notice the batter look thicker and fluffier, and that’s exactly what you want for structure and that irresistible texture.
Step 5: Stir in Flavor Makers
Gently fold in the vanilla extract, grated carrots, and chopped walnuts. These ingredients transform each bite with their sweetness, crunch, and classic flavor—every spoonful feels like a celebration of Burn-Away Cake traditions.
Step 6: Alternate Dry Ingredients and Buttermilk
Now comes the magic that makes this cake so tender. Begin adding the dry mixture and buttermilk to the bowl in turns—start and end with the dry mixture, mixing until just combined. Be careful not to overmix; a gentle hand keeps the cake airy and luscious.
Step 7: Bake to Golden Perfection
Pour the finished batter into your prepared pan, smoothing the top so it bakes up with an even crumb. Pop it into the oven for 35-40 minutes. You’ll know it’s done when a toothpick poked in the center comes out clean, and the kitchen smells like pure sweetness.
Step 8: Cool and Unmold
Let the cake cool in its pan for about 10 minutes (this helps set its crumb and makes it easier to unmold). Then, transfer to a wire rack to finish cooling completely—patience is key for perfect slices of Burn-Away Cake!
How to Serve Burn-Away Cake

Garnishes
Dress up your Burn-Away Cake with a generous dusting of powdered sugar, a dollop of whipped cream, or a silky swirl of cream cheese frosting. For a natural touch, sprinkle with extra chopped walnuts or a shower of fresh grated carrots for a pop of color and crunch that wows every time.
Side Dishes
Pair this cake with a scoop of vanilla ice cream or a cozy mug of chai tea to underline its autumnal spices. Sliced fresh fruit like apples or pears on the side can add a refreshing contrast to the rich, sweet crumb of the Burn-Away Cake.
Creative Ways to Present
Cut your Burn-Away Cake into petite squares and serve on a platter for a rustic dessert buffet, or layer cubes with whipped cream and berries in parfait glasses for an eye-catching trifle. You can even bake individual mini cakes using a muffin pan for the cutest party-ready treats!
Make Ahead and Storage
Storing Leftovers
Once your Burn-Away Cake is fully cooled, wrap slices tightly in plastic wrap or store in an airtight container at room temperature for up to three days. This keeps the crumb moist and the flavors fresh, making it a perfect treat for days after baking.
Freezing
To freeze, cut the cake into portions and wrap each one securely in plastic wrap, then pop them in a freezer bag. The Burn-Away Cake freezes beautifully—just thaw at room temperature whenever you’re ready for a sweet moment.
Reheating
If you love a warm slice, simply pop a piece in the microwave for 10-15 seconds or gently heat in a low oven. The cake regains its soft, bakery-fresh feel so every bite tastes like it just came out of the oven.
FAQs
Can I substitute the walnuts in Burn-Away Cake?
Absolutely! Chopped pecans or hazelnuts make a great alternative, or you can omit nuts altogether for a nut-free version without losing that classic smile-inducing flavor.
Do I need to peel the carrots before grating?
Peeling is ideal for the best texture and a cleaner look, but if you’re short on time and your carrots are scrubbed well, you can skip peeling for a slightly earthier flavor.
What type of oil is best for Burn-Away Cake?
Neutral oils like vegetable or canola oil work perfectly, but feel free to experiment with light olive oil or even melted coconut oil for a subtle twist on the cake’s flavor.
Can I double the recipe?
Yes! Simply double all ingredients and bake in a 9×13-inch pan, adjusting bake time as needed (usually an extra 10-15 minutes). You’ll have plenty of Burn-Away Cake to share with a crowd.
Is this cake freezer-friendly?
It sure is. Burn-Away Cake holds up remarkably well in the freezer, making it a perfect make-ahead dessert for holidays, celebrations, or surprise sweet cravings.
Final Thoughts
There’s something magical about baking Burn-Away Cake—it fills your kitchen with warmth, coziness, and just enough nostalgia for the sweets we all grew up loving. Give it a try and let this recipe become one of your cherished go-to desserts. Happy baking!
Your email address will not be published. Required fields are marked *