

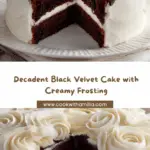
If you’re searching for a show-stopping dessert that’s as indulgent as it is gorgeous, look no further than this Black Velvet Cake Recipe. This cake is the tastiest twist on the classic red velvet, with a dramatic deep black hue, a delicate crumb, and layers of rich cream cheese buttercream. Every bite delivers a balance of chocolatey depth, moist texture, and irresistible creaminess, making it a true celebration cake for any occasion. Whether you’re baking for Halloween, a birthday, or just because, this Black Velvet Cake Recipe is bound to become a new favorite at your table!

Ingredients You’ll Need
The beauty of this cake is how simple but purposeful each ingredient is. Every single component is chosen to enhance the color, tenderness, and lusciousness of the finished dessert. Don’t skip or substitute—these ingredients are the secret to that unforgettable black velvet magic!
- All-purpose flour: Provides the structure and base for a perfectly tender crumb.
- Unsweetened cocoa powder: Deepens both flavor and color, adding a sophisticated richness.
- Baking soda: Helps the cake rise and stay light while balancing the tangy buttermilk.
- Baking powder: Works alongside baking soda for an even lift and airy texture.
- Salt: A pinch amps up all the chocolate and vanilla notes–never underestimate its effect!
- Granulated sugar: Sweetens the cake and guarantees a soft, moist bite every time.
- Eggs (2 large): Bind everything together, ensuring a cake that holds its shape but melts in your mouth.
- Buttermilk: The star for tang, tenderness, and a hint of classic velvet flavor.
- Vegetable oil: Keeps things perfectly moist, even days after baking—no dry cake here!
- Brewed coffee (hot): Intensifies the chocolate taste while making the batter luxuriously smooth.
- Vanilla extract: Rounds out the flavors with comforting warmth and aroma.
- Black food coloring: The magic behind the signature look—adjust the quantity for dramatic effect!
- Unsalted butter (softened): Gives the frosting a silky, rich base.
- Cream cheese (softened): Delivers tang and creaminess to complement the deep chocolate cake.
- Powdered sugar: Sweetens up the frosting to smooth, spreadable perfection.
- Vanilla extract (for frosting): Adds warmth and elevates the overall taste.
- Pinch of salt (for frosting): An essential that cuts through sweetness for a balanced finish.
How to Make Black Velvet Cake Recipe
Step 1: Prep and Sift the Dry Ingredients
Start your Black Velvet Cake Recipe by prepping your pans—grease and line two 8-inch round pans so your beautiful layers release without a hitch. In a large mixing bowl, sift together the all-purpose flour, cocoa powder, baking soda, baking powder, and salt. This step not only blends everything but also ensures your cake will be impossibly light and uniform in texture.
Step 2: Combine the Wet Ingredients
In a separate bowl, whisk the granulated sugar and eggs until smooth and pale. Add in the buttermilk and vegetable oil, then whisk until everything is creamy and combined—the key to that fabulously moist crumb. Stir in the vanilla extract and black food coloring, mixing well until the color is deep and dramatic. The color will intensify as it bakes, so don’t be shy with the food coloring if you want that truly jet-black effect.
Step 3: Mix Dry and Wet Mixtures
Gradually add the sifted dry ingredients to your wet mixture. Stir just until the flour disappears—you don’t want to over-mix, as that can lead to a dense cake. Once everything is almost incorporated, pour in the hot brewed coffee. This step is where the magic happens: the batter will become slightly thin, but that’s exactly what you want. The coffee won’t make your cake taste like coffee, but it will bump up the chocolate flavor and create that signature velvet feel.
Step 4: Bake
Pour the batter evenly into your prepared pans. Gently tap them on the counter to pop any air bubbles and slide them into your preheated oven at 175°C (350°F). Bake for 30 to 35 minutes, checking towards the end with a toothpick—if it comes out clean or with just a few moist crumbs, your Black Velvet Cake Recipe layers are done! Let them cool in the pans for 10 minutes before carefully turning out onto a wire rack to cool completely. This patience pays off—rushing this step risks tearing those perfect layers.
Step 5: Make the Cream Cheese Buttercream
While your cakes cool, it’s time to whip up the ultra-creamy frosting. Beat the softened butter and cream cheese together until fluffy and smooth. Gradually add the powdered sugar, mixing on low first (to avoid a sugar cloud!) then cranking it up high until you have a billowy, light buttercream. Beat in the vanilla extract and a pinch of salt to finish. The result is a tangy, silky frosting that contrasts beautifully with the dark cake layers—pure dessert bliss!
Step 6: Frost and Decorate
Once your cakes are totally cool, it’s time to layer them up. Spread a generous scoop of cream cheese buttercream between the layers, then cover the entire creation with more frosting. If you’re feeling fancy, decorate with black velvet crumbs, black sprinkles, or a slick chocolate drip for maximum impact. Stand back and admire your Black Velvet Cake Recipe masterpiece—it’s truly stunning!
How to Serve Black Velvet Cake Recipe

Garnishes
This cake is a natural showstopper, but a little extra flourish makes it truly special. Dot the top with crushed black velvet cake crumbs, dramatic black sprinkles, or even an elegant chocolate drip. For a spooky twist at Halloween, add shards of black chocolate or edible glitter for shimmer. Let your creativity shine—just a touch goes a long way in framing the deep black beauty of this Black Velvet Cake Recipe.
Side Dishes
Pairing your cake with something refreshing is always a win. Fresh berries, a scoop of vanilla ice cream, or a dollop of whipped cream are light and cooling against the rich, dense cake. For a grown-up touch, serve with espresso or an after-dinner liqueur—each brings out the velvety chocolate notes in this Black Velvet Cake Recipe.
Creative Ways to Present
If you’re in the mood to impress, try slicing your cake into small squares and presenting them on a platter as elegant finger desserts. Or use miniature cake molds for individual servings—perfect for events or parties. Want extra drama? Serve each slice on a stark white plate to highlight the dark color, or add a pop of red with berries for a striking contrast. However you serve it, this Black Velvet Cake Recipe always turns heads!
Make Ahead and Storage
Storing Leftovers
To keep your cake moist and fresh after slicing, cover it with plastic wrap or place leftovers in an airtight container. Store in the refrigerator for up to 4 days. Bring slices to room temperature before serving for the best flavor and texture—trust me, it’s worth the wait.
Freezing
If you want to get ahead for a party or just save some for a rainy day, this Black Velvet Cake Recipe freezes beautifully. Wrap unfrosted cake layers tightly in plastic wrap and aluminum foil, then freeze for up to 2 months. You can also freeze frosted slices, but make sure they’re well-protected to prevent freezer burn. Thaw overnight in the fridge before serving.
Reheating
Cake is best enjoyed at room temperature, but if you like it just a touch warm, microwave a slice for 7-10 seconds to soften the frosting and make it extra decadent. Be careful not to overheat, as cream cheese frosting can melt quickly. Enjoy every last bite of this Black Velvet Cake Recipe as if it were just baked!
FAQs
Can I use natural cocoa powder instead of Dutch-process?
Yes, you can use either, but Dutch-process will give your Black Velvet Cake Recipe a more intense color and smoother chocolate flavor while natural cocoa may result in a lighter shade and a touch more acidity. Both will taste delicious!
Is the black food coloring necessary?
The black food coloring is what gives this cake its dramatic, signature look. Without it, the cake will still taste incredible but will be a very dark brown instead of pitch black. For special occasions, a good gel or powder food color is worth the extra effort!
Is it possible to make this recipe gluten-free?
Absolutely! Swap the all-purpose flour for a trusted gluten-free flour blend that includes xanthan gum for best texture. Everything else in the recipe stays the same, so everyone can enjoy a slice of the Black Velvet Cake Recipe!
Can I bake this recipe as cupcakes instead?
Yes! Divide the batter evenly among lined cupcake tins, filling each about two-thirds full, and bake for 16-20 minutes or until a tester comes out clean. You’ll get perfectly portioned, dramatic cupcakes with minimal effort.
Can I omit the coffee?
If you don’t have coffee on hand or prefer not to use it, simply substitute with hot water or even hot milk. The coffee acts as a flavor enhancer and doesn’t make the cake taste like coffee, but your Black Velvet Cake Recipe will still be delicious without it.
Final Thoughts
This Black Velvet Cake Recipe is a true celebration dessert—unapologetically dramatic, ridiculously moist, and delightfully easy to pull off. I can’t wait for you to try it for your next special occasion (or simply because you deserve cake today!). Whip up a batch and prepare to wow everyone with every bold, chocolatey bite!
Your email address will not be published. Required fields are marked *