

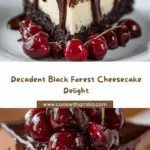
Get ready to fall in love with every decadent bite of this Black Forest Cheesecake! This showstopping dessert layers a crunchy Oreo crust with both vanilla and chocolate cheesecake fillings, then crowns it all with a glossy chocolate ganache and a luscious cherry topping. Each forkful delivers a burst of creamy, dreamy textures alongside the iconic Black Forest flavors. Whether for a celebration or a regular weekend treat, this cheesecake is guaranteed to make any occasion extraordinary.

Ingredients You’ll Need
Each ingredient in this Black Forest Cheesecake recipe brings essential flavor and texture. Don’t be intimidated by the list—these everyday staples work together to create layers of taste and a picture-perfect presentation!
- Oreo cookies: The rich, chocolatey base sets the stage with classic cookie crunch and just a hint of creaminess.
- Unsalted butter: Melted butter binds the cookie crumbs together for a cohesive, sliceable crust.
- Full-fat cream cheese: The foundation for a velvety-smooth, indulgent cheesecake; don’t skimp on fat content for the best texture!
- Granulated sugar: Gives the filling its balanced sweetness and smoothness.
- Vanilla extract: Adds warmth and depth to both the vanilla and chocolate layers.
- Large eggs: Bind the filling and contribute to the cheesecake’s luxurious creaminess.
- Sour cream: Offers tang and lightness, offsetting the cheesecake’s richness.
- Heavy cream: Whipped into the chocolate layer for extra silkiness and also used in ganache for a satiny finish.
- Semi-sweet chocolate (chips and bar): A double dose enhances both the filling and the swoon-worthy ganache topping.
- Cherry pie filling: Traditional and essential, it brings the dramatic, mouthwatering sparkle—and those classic Black Forest vibes!
How to Make Black Forest Cheesecake
Step 1: Prepare the Oreo Crust
Start your Black Forest Cheesecake with an irresistible crunchy base. Preheat your oven to 175°C (350°F) and grab a 9-inch springform pan. Combine crushed Oreo cookies with melted butter, mixing until every crumb is shiny and saturated. Press the mixture firmly and evenly into the bottom of your pan, using the back of a spoon or your fingertips. After a quick 10-minute bake, set your crust aside to cool—this little step locks in flavor and prevents sogginess.
Step 2: Make the Cheesecake Fillings
Here’s where the magic happens! Whip together the plain cheesecake filling by blending softened cream cheese with sugar, offset with vanilla and a touch of sour cream. Add the eggs one at a time for a smooth, luscious result. For the chocolate filling, beat more cream cheese and sugar, fold in melted chocolate and vanilla, then gently incorporate whipped heavy cream for an airy, mousse-like texture. Two bowls, two delightful layers!
Step 3: Assemble and Bake
Pour the vanilla filling over your cooled Oreo crust, smoothing it into every corner. Gently spoon the chocolate filling on top—if you’re a perfectionist, swirl the top for a marbled effect! Bake your cheesecake for 50 to 60 minutes, until the edges are set but the center still wobbles slightly. This subtle jiggle means you’ll get a silky center.
Step 4: Cool and Chill
Don’t rush this part! After baking, let your cheesecake cool inside the oven with the door slightly ajar—this prevents sudden temperature changes that can cause cracks. Once an hour has passed, transfer the pan to a wire rack and let the cake cool completely. When it’s room temperature, cover and refrigerate for at least 6 hours (or overnight for foolproof slicing).
Step 5: Make the Ganache
The glossy finish that takes this Black Forest Cheesecake over the top! Combine chocolate chips and heavy cream in a heatproof bowl, then microwave in short bursts, stirring until smooth and shiny. The ganache should be pourable but not runny—let it cool for a minute or two if it’s too hot.
Step 6: Garnish and Serve
Release the cheesecake from its pan and set it on your prettiest cake stand. Drape it with your warm ganache, letting some flow dramatically down the sides. Finally, spoon on that cherry pie filling, mounding the fruit as high as you like. The results look as bakery-worthy as they taste!
How to Serve Black Forest Cheesecake

Garnishes
Take your Black Forest Cheesecake from delicious to absolutely dazzling with a few simple touches. Besides the classic cherry topping and chocolate ganache, add a flourish of whipped cream, a sprinkle of shaved chocolate, or even extra fresh cherries if they’re in season. For a special touch, dust lightly with powdered sugar just before serving.
Side Dishes
With such a rich, chocolatey main event, keep your accompaniments light and fresh! Offer black coffee, espresso, or tea to complement the cake’s sweetness. A spoonful of vanilla ice cream adds lovely contrast, while sparkling water with a twist of lemon helps cleanse the palate between bites.
Creative Ways to Present
Beyond the classic slices, try cutting the Black Forest Cheesecake into bite-sized cubes and skewering them alongside fresh berries for party-ready dessert kabobs. Or layer small pieces in glass jars with whipped cream and extra ganache for adorable mini trifles. If you’re entertaining, gild the lily by arranging each slice with an artful streak of cherry sauce on the plate for extra wow-factor.
Make Ahead and Storage
Storing Leftovers
Black Forest Cheesecake keeps beautifully! Store any leftovers covered in the refrigerator for up to 5 days. Place plastic wrap directly against the cut edge or use an airtight container to maintain moisture and freshness without absorbing fridge odors.
Freezing
For longer storage, freeze individual slices (or the whole cheesecake, ungarnished) tightly wrapped in plastic wrap and aluminum foil. Cheesecake will keep for up to 2 months in the freezer. Thaw it overnight in the fridge before garnishing and serving so every layer stays creamy and perfect.
Reheating
This dessert is best enjoyed chilled, but if you prefer a softer texture, allow your slice to sit at room temperature for about 20 minutes before serving. Avoid microwaving, as it can compromise the texture and cause the ganache or filling to separate.
FAQs
Can I use a different crust instead of Oreos?
Absolutely! Graham cracker crumbs or chocolate wafer cookies work wonderfully if you want a different flavor profile or have Oreos on hand. Just keep the proportions similar and follow the same instructions for pressing and baking the crust.
What can I use in place of cherry pie filling?
You can make your own cherry compote with fresh or frozen cherries, sugar, and a splash of lemon juice. Raspberry or strawberry pie filling are also delicious for a fruity twist if you’re not a fan of cherries.
How do I prevent cracks in my cheesecake?
Let your cheesecake cool slowly in the oven with the door cracked after baking, and don’t overmix the batter, especially after adding eggs. Chilling thoroughly also helps maintain a silky, crack-free top—plus, most cracks will hide under the ganache and cherries anyway!
Is it necessary to use a springform pan?
A springform pan is highly recommended for easy and beautiful removal of your Black Forest Cheesecake, but in a pinch, a deep pie dish or a removable-bottom cake pan can work too. Just remember to line the bottom with parchment for easy lifting.
Can I make this recipe gluten-free?
Yes! Simply substitute gluten-free chocolate sandwich cookies for the Oreos in your crust. Double-check the labels on your chocolate and pie filling to ensure all ingredients are gluten-free, and you’re good to go.
Final Thoughts
Bring a little extra joy to your table with this Black Forest Cheesecake! It’s a crowd-pleaser that never fails to impress, and every bite is a celebration of chocolate, cherries, and cream. Don’t wait for a special occasion—treat yourself and your loved ones to a homemade masterpiece that tastes as spectacular as it looks!
Your email address will not be published. Required fields are marked *