

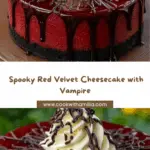
Sink your teeth into a showstopping dessert that’s equal parts spooky and decadent: the Vampire Bite Red Velvet Cheesecake. With its velvety cocoa-infused filling, rich chocolate cookie base, and hauntingly realistic raspberry “blood” sauce, this cheesecake is as much a feast for the eyes as it is for the palate. Whether it’s for a Halloween gathering, a gothic-themed party, or just a fun weekend bake, this dramatic treat is bound to thrill your guests. Prepare yourself for a bite that’s sweet, creamy, and a little bit mysterious!

Ingredients You’ll Need
Every ingredient in this Vampire Bite Red Velvet Cheesecake has a special job: from building up that deep red hue to balancing richness and bringing those “vampire bite” visuals to life. Stick to these essentials for the ultimate texture, taste, and dramatic flair!
- Chocolate cookie crumbs: These create a decadently dark, crunchy base that beautifully complements the red velvet filling.
- Unsalted butter: Melted butter perfectly binds the crumbs and gives the crust its irresistible richness.
- Cream cheese: The backbone of any cheesecake; use full-fat, room-temperature cream cheese for smoothness.
- Granulated sugar: Just the right sweetness to balance out the cocoa and tanginess from the cheese.
- Large eggs: Eggs provide structure and help everything set while staying luxuriously creamy.
- Sour cream: Adds a subtle tang and extra creaminess to the finished dessert.
- Vanilla extract: Brings warm depth and rounds out all the flavors.
- Cocoa powder: Just a bit intensifies the color and gives those classic red velvet undertones.
- Red food coloring (gel preferred): Essential for that bold, dramatic red—gel versions give the most vibrant effect!
- Raspberry or strawberry sauce: Use this for the “blood” topping—pick your favorite for a fruity, realistic drip.
- Optional edible fake blood gel: For an extra-scary vampire mark, this adds a gory, picture-perfect touch.
How to Make Vampire Bite Red Velvet Cheesecake
Step 1: Prepare the Chocolate Cookie Crust
Start by blitzing your favorite chocolate cookies into fine crumbs, then mixing them with melted butter until the mixture looks like wet sand. Press the mixture evenly into the bottom of a greased 9-inch springform pan, using gentle pressure so your crust holds together and can hold up that luscious filling. Pop it in the fridge to set while you move onto the magic of the cheesecake layer.
Step 2: Whip up the Red Velvet Cheesecake Filling
Grab a large bowl and blend your softened cream cheese and granulated sugar until you have a sumptuously smooth batter—no lumps allowed! Beat in the eggs one at a time, taking care not to overmix, which keeps your cheesecake extra creamy. Stir in the sour cream, vanilla, cocoa powder, and finally the red food coloring, mixing until totally combined and vibrantly red. This is where the Vampire Bite Red Velvet Cheesecake starts coming to life!
Step 3: Assemble and Bake
Crank up your oven to 325°F (160°C). Pour the scarlet filling over your set crust and gently smooth the top. Bake for 50 to 60 minutes; you want it just set in the center so it stays creamy. For perfect, crack-free cheesecake, turn off the oven, crack the door open, and let it cool for an hour inside. This gentle cooling step helps keep your Vampire Bite Red Velvet Cheesecake picture-perfect.
Step 4: Chill Until Set
Once your cheesecake is mostly cool, take it out, cover it, and refrigerate for at least four hours—overnight is even better. This ensures each bite is silky-smooth and the flavors are beautifully melded.
Step 5: Create the Vampire Bite Red Velvet Cheesecake Effect
Now for the grand finale: right before serving, drizzle your raspberry or strawberry sauce over the top, letting it ooze and drip for jawsome “blood” drips. For that iconic vampire bite, make two small holes on the surface and fill them with your fruit sauce or edible fake blood gel. Swirl it around or let it drip naturally—don’t fret about perfection, the messier, the spookier! Slice, serve, and watch your guests’ eyes widen with delicious delight.
How to Serve Vampire Bite Red Velvet Cheesecake

Garnishes
This cheesecake is already a show-stopper, but a few finishing touches—like a swirl of whipped cream, a sprinkle of chocolate shavings, or a handful of fresh berries—can elevate the spookiness even more. If you’re feeling adventurous, edible red glitter or some piped webs made from white chocolate give it a true Halloween or gothic edge.
Side Dishes
Vampire Bite Red Velvet Cheesecake pairs beautifully with simple, refreshing sides like a bowl of mixed berries, or something as easy as a hot cup of coffee or black tea. For a themed party, a blood-red berry punch or a glass of cabernet makes the experience extra dramatic.
Creative Ways to Present
Serve this cheesecake on a black or crystal platter for maximum visual impact. Mini cheesecakes made in muffin tins are perfect for parties—just decorate each with its own “vampire bite.” Set the scene with spooky props, or add edible eyes, candy bats, or dry ice for an interactive, Instagram-worthy centerpiece.
Make Ahead and Storage
Storing Leftovers
Store any leftover Vampire Bite Red Velvet Cheesecake tightly covered in the refrigerator for up to five days. Keep the fruit sauce separate if you want to refresh the “bite” presentation when serving again, and always use a clean, sharp knife to maintain those gorgeous slices.
Freezing
If you have extra (or you want to get ahead), this cheesecake freezes wonderfully. Simply wrap the whole (or sliced) cheesecake in several layers of plastic wrap and then foil, storing without the sauce topping. Thaw overnight in the fridge, then add your raspberry “blood” just before serving for freshest results.
Reheating
Cheesecake is best enjoyed chilled or at cool room temperature—not heated. If it’s very cold from the fridge, let your slice sit out for about 15-20 minutes before digging in, allowing the flavors and creamy texture to shine.
FAQs
Can I use a different type of cookie or crust?
Absolutely! Graham crackers, vanilla wafers, or even a gluten-free cookie can stand in for chocolate cookies. Just be sure to keep the butter ratio the same so your crust holds together.
Do I have to use gel food coloring?
Gel food coloring gives the most vibrant red hue without watering down the batter, but you can use liquid in a pinch. Just add a little at a time until you hit your desired intensity.
Can I make Vampire Bite Red Velvet Cheesecake ahead of time?
Yes, this recipe is perfect for making in advance. Bake and chill the cheesecake a day (or two) early, then decorate with the sauce and “bites” right before serving for the best texture and wow factor.
How do I prevent cracks on my cheesecake?
Letting the cheesecake cool gradually in the oven with the door cracked helps a lot. Also, don’t overmix the batter and avoid opening the oven while baking. And don’t worry: a little raspberry sauce covers any minor cracks with flair!
What other toppings can I use for the “blood” effect?
If raspberry or strawberry sauce isn’t your style, try cherry jam thinned with a bit of warm water, or even a chocolate ganache tinted with red food coloring for a super rich “vampire” touch.
Final Thoughts
This Vampire Bite Red Velvet Cheesecake is more than just a dessert—it’s an edible centerpiece, a creative adventure, and a sure way to impress everyone lucky enough to get a slice! Don’t be afraid to get playful with the decorations, and most of all, savor every bite of this devilishly delightful treat. Give it a try, and let your inner vampire come out to play!
Your email address will not be published. Required fields are marked *