
 Recipe 1")
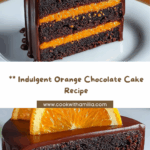
Get ready to enjoy an unforgettable treat with this Orange Chocolate Cake (with Orange Filling & Chocolate Frosting)! Imagine bites of ultra-moist chocolate cake layered with sunshine-bright orange filling, all wrapped up in a cloud of creamy chocolate frosting. Each forkful is balanced, bold, and simply decadent. This dreamy dessert is perfect for birthdays, celebrations, or whenever you crave that special combination of citrus and chocolate that makes everyone swoon. If you’re searching for the ultimate showstopper, this is the recipe your friends and family will remember for years to come!
Ingredients You’ll Need
 Recipe 2")
Ingredients You’ll Need
We’re talking about honest, pantry-friendly ingredients here—the kind that build flavor from the ground up. Each one makes a unique contribution to the texture, color, or taste of this Orange Chocolate Cake (with Orange Filling & Chocolate Frosting), so don’t skip a thing!
- All-purpose flour: The backbone for structure, making every layer tender yet sturdy enough to hold the filling and frosting.
- Unsweetened cocoa powder: Deeply flavors the cake with real chocolate richness—always use high-quality for the best flavor punch.
- Baking powder & baking soda: Team up to give the cake a beautiful rise and irresistibly soft crumb.
- Salt: Just a half teaspoon brings out the other flavors and balances the sweetness.
- Granulated sugar: Sweetens both the cake and the orange filling, giving each bite that beloved dessert lift.
- Eggs: Four large eggs make everything rich and plush, and help bind it all together.
- Vegetable oil: Ensures your cake stays incredibly moist and tender—no dry crumb here!
- Buttermilk: Adds a hit of tang and extra tenderness, plus reacts with baking soda for perfect fluffiness.
- Hot water: Creates a silky, pourable batter that bakes into soft layers and helps intensify the cocoa.
- Vanilla extract: Essential for rounding out both the cake and frosting flavors—just that hint takes this cake over the top.
- Fresh orange juice: The star of the orange filling, offering tartness and pucker-worthy zing.
- Orange zest: Packs in aromatic oils for true orange fragrance and depth—don’t skip this!
- Cornstarch: Thickens the filling so it’ll sit beautifully between your cake layers without running.
- Unsalted butter: Used in both the filling and the frosting for a rich, creamy mouthfeel.
- Powdered sugar: Makes our frosting sweetly smooth and easy to whip into dreamy peaks.
- Heavy cream: Lets the frosting become luxuriously fluffy and spreadable; add more as needed for your desired texture.
- Pinch of salt: Just enough to tame the sweetness and amplify the overall chocolatey-ness of your frosting.
How to Make ith Orange Filling & Chocolate Frosting)
Step 1: Prepare the Cake Pans and Preheat Oven
Start by setting yourself up for cake success—preheat your oven to 350°F (175°C) and grease four 8-inch round cake pans. Then line them with parchment so the layers slip right out after baking. A little prep now equals stress-free cake assembly later!
Step 2: Mix the Dry Ingredients
Whisk together the flour, unsweetened cocoa powder, baking powder, baking soda, and salt in a medium bowl. This ensures everything’s evenly distributed so you’ll get a gorgeously consistent crumb throughout your Orange Chocolate Cake (with Orange Filling & Chocolate Frosting).
Step 3: Combine the Wet Ingredients
In a large bowl, use a hand or stand mixer to beat together the granulated sugar, eggs, and vegetable oil until thoroughly combined and slightly thickened. Pour in the buttermilk and vanilla extract, then mix again until totally smooth. This forms the luscious, flavor-packed base of your cake batter!
Step 4: Bring Batter Together and Add Hot Water
Add your dry mixture to the wet ingredients, mixing gently by hand or at low speed. Finally, slowly stir in your hot water. The batter will be thin—don’t worry! That’s the magic behind this super-moist result. Carefully divide the batter between the prepared pans.
Step 5: Bake and Cool
Slide your cake pans into the oven and bake for 22 to 28 minutes. You’ll know they’re done when a toothpick inserted in the center comes out clean. Let them cool in the pans for a few minutes before transferring to wire racks to cool completely. Patience is key—a cooled cake is much easier to frost and fill!
Step 6: Make the Orange Filling
In a saucepan, whisk together the fresh orange juice, zest, sugar, and a cornstarch-water mixture. Cook over medium heat, stirring constantly until it thickens into a glossy, spreadable filling. Whisk in the butter for silky smoothness. Set aside to cool; it should be completely chilled before you start building your Orange Chocolate Cake (with Orange Filling & Chocolate Frosting).
Step 7: Whip Up the Chocolate Frosting
Beat softened butter until creamy, then gradually add powdered sugar, cocoa powder, and a generous pinch of salt. With the mixer running, drizzle in the heavy cream until the frosting is light and fluffy—stop and scrape the bowl as needed. Finish it off with vanilla extract and another quick beat for good measure.
Step 8: Assemble and Decorate
Place the first cooled cake layer on your serving plate. Spread a layer of the orange filling over the top. Stack with the second cake layer, followed by more orange filling, and repeat with the third layer. Place the final cake layer on top, then generously frost the entire cake with your whipped chocolate frosting. For the final flourish, add orange zest, chocolate curls, or a few slices of candied orange to wow the crowd!
How to Serve ith Orange Filling & Chocolate Frosting)
Garnishes
Give your Orange Chocolate Cake (with Orange Filling & Chocolate Frosting) that extra sparkle with a sprinkle of fresh orange zest, decadent chocolate curls, or even thin slices of candied orange. These little touches add color, aroma, and a hint of texture that make each slice look irresistibly elegant.
Side Dishes
Keep it simple so your cake truly shines. Pair with a scoop of vanilla bean ice cream for a creamy counterpoint, or a dollop of lightly sweetened whipped cream. If you’re serving a crowd, a platter of fresh berries balances out the cake’s richness and adds a pop of brightness.
Creative Ways to Present
You can go classic with tall, beautiful layers, or try slicing into small, bite-sized squares for a dessert platter. For parties, serve mini cake rounds topped with piped frosting and a curl of orange peel. Don’t be afraid to play with edible flowers or geometric chocolate shards for next-level visual appeal!
Make Ahead and Storage
Storing Leftovers
Store any leftover Orange Chocolate Cake (with Orange Filling & Chocolate Frosting) in the refrigerator, well covered with plastic wrap or in an airtight container. The cake layers and filling both hold up beautifully for up to four days, and the flavors deepen over time.
Freezing
For longer storage, freeze individual slices or whole layers, tightly wrapped. Simply wrap pieces in plastic and then aluminum foil, or pop them in a freezer-safe container. The cake freezes well for up to two months—just thaw overnight in the fridge when you’re ready to indulge again.
Reheating
If you prefer your cake a touch warm, set slices out at room temperature for 20 to 30 minutes, or microwave for just 10-15 seconds (remove any decorative toppings first!). This softens the frosting and intensifies the chocolate flavor, — talk about comfort!
FAQs
Can I use bottled orange juice for the filling?
Fresh orange juice is always best for the brightest flavor in your Orange Chocolate Cake (with Orange Filling & Chocolate Frosting), but in a pinch, a high-quality bottled juice will work. Just be sure it’s 100 percent juice with no added sugars or flavors, as those can alter the taste.
Do I need to use buttermilk, or can I substitute it?
Buttermilk provides wonderful tenderness and slight tang in the cake layers, but if you don’t have any handy, you can make a quick substitute: add 1 tablespoon of lemon juice or vinegar to a measuring cup, fill to 1 ½ cups with milk, stir, and let sit for 5 minutes.
How do I ensure my cake layers don’t stick to the pan?
Greasing and lining your pans with parchment is essential—run a knife gently around the edges once baked, and your layers should pop right out without a fuss. A bit of patience while the cakes cool also helps prevent sticking.
Can I assemble the cake in advance?
Absolutely! You can assemble your Orange Chocolate Cake (with Orange Filling & Chocolate Frosting) the day before your event. The flavors actually get even better as they rest together. Just keep the cake covered in the fridge and let it stand at room temperature for about 30 minutes before serving.
What’s the best way to get super clean slices?
For picture-perfect slices, dip a large, sharp knife in hot water and wipe it dry between cuts. This melts through the frosting smoothly and keeps the vibrant orange filling intact for those drool-worthy layers.
Final Thoughts
If you’re ready to bake something that’s sure to amaze, Orange Chocolate Cake (with Orange Filling & Chocolate Frosting) is calling your name! Whether you share it at a party or treat yourself to a quiet slice with coffee, there’s just nothing like the blend of citrus and chocolate. Gather up your ingredients and get ready to bake a cake that’s destined to become a favorite in your kitchen. Enjoy every delicious bite!
Your email address will not be published. Required fields are marked *