

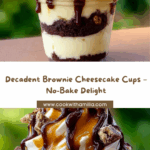
If you’re searching for pure decadent bliss in every bite, you’ve come to the right place! Loaded Brownie Cheesecake Cups combine the richness of fudgy brownies with silky smooth cheesecake filling, all tucked into single-serve jars or cups for the ultimate personal dessert. These cups are a fabulous blend of soft chocolatey base and cloud-like cheesecake, perfect for impressive parties or those spontaneous late-night cravings. Plus, they’re a breeze to whip up and require zero baking. Trust me, these are bound to become your new favorite treat!

Ingredients You’ll Need
Gather a handful of pantry and fridge staples, because every component of Loaded Brownie Cheesecake Cups works together to create a treat that’s the definition of “worth it.” Each ingredient brings its own magic, from creamy textures to chocolaty depths and just the right touch of sweetness.
- Fudgy brownies, crumbled (2 cups): Use homemade or store-bought brownies—whichever you prefer! The fudgier, the better for a moist, chewy base.
- Cream cheese, softened (1 ½ cups): Make sure it’s at room temperature, so your cheesecake filling turns out silky without any lumps.
- Powdered sugar (½ cup): Adds gentle sweetness and helps make your cheesecake base smooth as velvet.
- Vanilla extract (1 tsp): Just a splash of vanilla gives the filling a warm, comforting aroma.
- Heavy whipping cream (1 cup): Whipped to stiff peaks, this adds dreamy lightness to your cheesecake layer and helps it set perfectly.
How to Make Loaded Brownie Cheesecake Cups
Step 1: Build Your Brownie Base
Start by spooning your crumbled brownies into the bottoms of serving cups or jars. Press them down gently to make an even, chocolatey layer. Don’t pack them too hard—you want that layer to stay a bit soft and chewy with every spoonful!
Step 2: Whip Up the Cheesecake Filling
In a large bowl, beat your softened cream cheese until it’s completely smooth and creamy. Add the powdered sugar and vanilla, mixing until everything is perfectly combined. In a separate bowl, whip your heavy cream until you get sturdy, cloud-like peaks. Now comes the special part: gently fold the whipped cream into your cream cheese mixture. This gives you a cheesecake filling that’s unbelievably light and airy—an essential step for these Loaded Brownie Cheesecake Cups.
Step 3: Assemble Those Heavenly Layers
Spoon or pipe the cheesecake filling generously over each brownie base. Smooth it out or add a swirl for a pretty finish. If you’re feeling extra indulgent, scatter a few more brownie crumbs or even chocolate shavings right on top for a gorgeous, mouthwatering look.
Step 4: Chill & Finish
Patience pays off here! Pop your assembled cups into the refrigerator for at least an hour. Chilling is what gives the cheesecake layer its luscious set and lets all the flavors come together. When you’re ready, serve them up cold and watch the smiles appear!
How to Serve Loaded Brownie Cheesecake Cups

Garnishes
A little garnish brings these Loaded Brownie Cheesecake Cups from delicious to absolutely irresistible. Try extra brownie crumbs, a dusting of cocoa powder, chocolate curls, or even a dollop of whipped cream. For something more grown-up, a drizzle of caramel or a few fresh berries can add the perfect finishing touch.
Side Dishes
Though these cups are showstoppers on their own, you can pair them with fresh strawberries, raspberries, or a citrus fruit salad to brighten up the richness. Coffee or espresso makes a lovely match, too—it’s a classic combination that elevates the chocolate and cheesecake notes.
Creative Ways to Present
Presentation is half the fun! Mason jars or elegant parfait glasses make each serving look thoughtfully crafted. For parties, try mini dessert cups or shot glasses for a bite-sized treat. You can even layer in extra add-ins—think chopped nuts or caramel chips—to make your Loaded Brownie Cheesecake Cups truly custom.
Make Ahead and Storage
Storing Leftovers
If you manage to have any leftovers, just cover the cups tightly with plastic wrap or lids and refrigerate. Loaded Brownie Cheesecake Cups will stay fresh for up to 3 days, though the texture is at its best in the first 48 hours.
Freezing
These cups can be frozen for longer storage! Wrap each serving well with plastic wrap and foil to prevent freezer burn. When ready to enjoy, thaw them overnight in the fridge. The filling will remain creamy and delicious, making these perfect for prep-ahead desserts.
Reheating
No reheating necessary—this dessert is meant to be enjoyed chilled! If you’ve frozen them, simply let them come up to fridge temperature before serving for that perfect creamy texture and flavor.
FAQs
Can I use store-bought brownies for the base?
Absolutely! Store-bought brownies work wonderfully and make the process even faster. Just crumble them up and use as directed for delicious Loaded Brownie Cheesecake Cups every time.
What’s the best way to get smooth cheesecake filling?
Be sure to let your cream cheese fully soften at room temperature and beat it well before adding other ingredients. This small detail helps prevent lumps and ensures your filling is silky smooth.
How far ahead can I assemble these cups?
You can assemble them up to a day in advance. Just keep them refrigerated and add any extra toppings right before serving for the freshest flavor and texture.
Can I make these cups gluten-free?
Yes, simply use your favorite gluten-free brownies as the base. The cheesecake filling is naturally gluten-free, which makes this dessert easy to adapt for special diets.
What’s the secret to fluffy cheesecake filling?
Gently folding whipped cream into the cream cheese mixture keeps it light and airy. Overmixing can deflate the filling, so fold just until combined for the fluffiest Loaded Brownie Cheesecake Cups.
Final Thoughts
If you love chocolate and crave creamy cheesecake, these Loaded Brownie Cheesecake Cups will be your new go-to treat. They’re simple, stunning, and just plain fun to make and eat. Give them a try—you’ll want to enjoy them on every special occasion (or just because) from now on!
Your email address will not be published. Required fields are marked *