

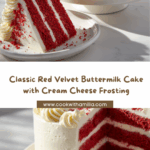
If you’re searching for a showstopping dessert that marries elegance, irresistible flavor, and pure nostalgia, look no further than this Red Velvet Buttermilk Cake. This classic Southern gem boasts a tender crumb, subtle cocoa undertones, and that iconic, vibrant hue—topped with swirls of luscious cream cheese frosting. Whether it’s for birthdays, holidays, or that random Tuesday treat, friends and family are bound to gush over every beautiful slice.

Ingredients You’ll Need
Your journey to the perfect Red Velvet Buttermilk Cake starts with everyday essentials—each one plays a starring role in the cake’s flavor, color, and signature texture. Gather these with confidence, knowing your efforts will pay off in every delicious bite!
- All-Purpose Flour: Gives structure to your tender cake layers; sift for the dreamiest crumb!
- Granulated Sugar: Sweetens the cake and helps maintain a moist, delicate texture.
- Baking Soda: Ensures the cake rises beautifully and stays light.
- Fine Salt: Balances sweetness and amplifies all the other flavors.
- Unsweetened Cocoa Powder: Adds the subtle, signature cocoa notes that make red velvet unique.
- Vegetable Oil: Keeps the cake ultra-moist and tender—no dry bites here!
- Buttermilk (room temperature): The star liquid, giving that signature tang and contributing to the cake’s soft crumb.
- Eggs (room temperature): Bind the ingredients together and boost richness.
- Red Food Coloring: Provides that dramatic, bold color—gel or liquid both work well.
- White Distilled Vinegar: Reacts with baking soda for a perfect rise, and sharpens the cake’s flavor.
- Vanilla Extract: Lends warmth and rounds out all the flavors.
- Unsalted Butter (softened): The frosting’s creamy, rich backbone—softening ensures a smooth blend.
- Cream Cheese (softened): Delivers that tangy, satiny flavor everyone craves in traditional frosting.
- Powdered Sugar: Sweetens and thickens the frosting for perfect spreadability.
- Pinch of Salt: A little in the frosting makes sweetness pop without overwhelming the palate.
How to Make Red Velvet Buttermilk Cake
Step 1: Prepare the Cake Batter
Begin by preheating your oven to 350°F (175°C) and prepping three 8-inch round cake pans—either grease and flour them or line with parchment for easy removal. In a large bowl, sift together the flour, sugar, baking soda, salt, and cocoa powder. In a separate bowl, whisk together the oil, buttermilk, eggs, vibrant red food coloring, vinegar, and vanilla. Slowly fold the dry ingredients into the wet mixture, mixing only until just combined. This delicate approach keeps your Red Velvet Buttermilk Cake ultra tender and airy.
Step 2: Bake the Cakes
Divide your beautiful red batter evenly among the prepared pans—using a kitchen scale is the easiest way to get even layers. Pop them into the oven and bake for 25 to 30 minutes, until a toothpick comes out clean. Let them cool in their pans for 10 minutes, then run a knife around the edges and transfer to a wire rack to finish cooling. Patience is key here; assembling is so much easier with completely cool cakes!
Step 3: Make the Cream Cheese Frosting
While the cakes are cooling, grab a large bowl and beat together softened butter and cream cheese until ultra light and fluffy—give it a good three minutes. Gradually add the powdered sugar, one cup at a time, pausing to scrape the bowl and making sure everything is smooth. Stir in vanilla and a pinch of salt, then beat another couple of minutes so it’s irresistibly creamy. If your kitchen is warm or the frosting seems a little loose, pop it in the fridge for 10–15 minutes; it will firm up and spread like a dream.
Step 4: Assemble the Cake
Ready for the fun part? Level each cooled cake with a serrated knife if needed, then set the first layer onto a cake stand. Spread a thick layer of frosting on top, then repeat with the second and third layers. Embrace the crumb coat: apply a thin layer of frosting all around the cake to seal in pesky crumbs, then chill for about 20 minutes. Finish with a generous final coat of frosting, smoothing it out with an offset spatula. For classic Red Velvet Buttermilk Cake flair, pipe elegant swirls on top and sprinkle over vibrant cake crumbs. It’s almost too pretty to cut—almost.
How to Serve Red Velvet Buttermilk Cake

Garnishes
There’s a reason this cake appears at so many celebrations—the right garnishes make it irresistible. Beyond the classic cream cheese swirls and a scatter of bright crumbs, try white chocolate curls, a dusting of powdered sugar, or a handful of fresh raspberries for a colorful, tangy contrast.
Side Dishes
Your Red Velvet Buttermilk Cake absolutely shines next to a scoop of vanilla bean ice cream or a dollop of lightly sweetened whipped cream. For an afternoon tea or holiday table, pair it with fresh berries or serve alongside a pot of robust coffee or black tea for maximum coziness.
Creative Ways to Present
Looking to shake things up? Bake the layers as cupcakes for adorable, handheld treats—just pipe that cream cheese frosting high. Slice thinner layers for a dramatic naked cake effect, or cut the cake into mini rounds and build individual desserts. For special occasions, edible gold leaf or delicate sugar flowers add an extra festive flourish.
Make Ahead and Storage
Storing Leftovers
If you happen to have leftover Red Velvet Buttermilk Cake (lucky you!), cover slices tightly with plastic wrap or stash in an airtight container. Store in the fridge for up to five days—the flavors only get richer over time, and the frosting helps keep everything moist and delectable.
Freezing
Both cake layers and frosted cakes freeze beautifully. Wrap each cooled, unfrosted layer in plastic wrap and then foil for up to two months. For a fully frosted cake, freeze uncovered until firm, then wrap well. Thaw overnight in the fridge when ready to enjoy—your future self will thank you!
Reheating
Red Velvet Buttermilk Cake is best served at room temperature, especially to enjoy that dreamy, creamy frosting. If your cake is chilled, set out individual slices for about 30 minutes before serving. Avoid microwaving frosted slices, as the frosting can melt and become runny.
FAQs
Can I use natural or Dutch-process cocoa powder for this cake?
Absolutely! Either variety will add delightful cocoa notes, but natural cocoa adds a more classic, subtle flavor, while Dutch-process can deepen the color and richness. Just be mindful not to swap out more than called for, as the cake’s flavor and color both benefit from a light cocoa presence.
What’s the best type of food coloring for Red Velvet Buttermilk Cake?
Both gel and liquid food coloring work, but gel tends to offer a more vibrant hue with less product. Opt for a good-quality brand if you want a truly memorable, dramatic red!
Can I make this Red Velvet Buttermilk Cake gluten-free?
Yes, you can easily substitute your favorite 1:1 gluten-free flour blend in place of all-purpose flour. Just make sure the rest of your ingredients are gluten-free, and expect a slightly different (but still delicious!) texture.
My cake layers dome in the oven—how can I get flat cakes?
First, make sure not to overmix your batter. For perfectly even layers, use bake-even strips around the pans or gently press the tops with a towel right after baking. And don’t forget: a little leveling with a serrated knife works wonders!
Is it possible to make Red Velvet Buttermilk Cake ahead of time?
Definitely—this cake is actually better after a day in the fridge, as the flavors meld and the crumb becomes even more tender. You can bake the layers a day or two ahead, then frost and assemble when you’re ready to serve.
Final Thoughts
There’s something deeply joyful about baking and serving a homemade Red Velvet Buttermilk Cake. Whether you’re a first-timer or a seasoned baker, give this beloved recipe a try and watch it turn any occasion into a red-letter day—one delicious, brilliant slice at a time!
Your email address will not be published. Required fields are marked *